"I love my cats because I love my home, and little by little they become its visible soul." Jean Couteau

Thursday, May 28, 2015

here is a pot for your herbs

I kind of took the winter off from projects. Not intentionally, it just sort of happened. But now I'm back with a vengeance. I've recently been working on three projects, with a couple more in the planning.

I'm going to start with the simplest project. I'd been thinking about growing some herbs for awhile. Some recipes I use call for fresh parsley or basil or something, but the amount I would use is less than how much you have to buy in the store, and I don't always have a use for the rest of it. Yes, I could do better recipe planning for the week to do all recipes that need fresh basil, but realistically, I'm just not going to go to that much effort. So I thought it would be great to grow a few of my own herbs, and then I could just grab a couple of leaves as needed. 

I had an old window box planter that I thought would be perfect to put a couple of herb plants in, but it was a faded sort of grey-green that would not look good in the dining room, so I decided to give spray painting it a try. I got Rustoleum spray paints in white and a sort of yellow-orange that ended up being a bit more yellow than intended. I wanted to do the bottom tray part in white and the rest yellow.

I started out by turning the planter upside down and spray painting the bottom white. Initially, I thought it would be easiest to take off the bottom tray and paint the pieces separately. However, being an older planter, the bottom was firmly connected, and the plastic started cracking when I tried to pull the pieces apart. So I just sprayed the bottom and didn't worry about over-spray since I'd be painting the top anyway. After a few coats of white and letting that dry fully, I taped Frog tape around the white bottom, turned the planter right-side up, and spray painted the rest yellow. I tried to get a good amount of the inside painted too, since the dirt wouldn't be coming all the way to the top.


And that was that. Like I said before, the color wasn't quite what I was going for. I was trying to match the more mustard yellow I had used for these side tables in the dining room and the plant table in the living room. This turned out a brighter yellow, but I think it will be fine.


Next up, painting a yard sale side table for this planter to live on! But that's a post, and a project, for another day...

Tuesday, May 26, 2015

decluttering a cabinet

This post has been mostly done for a few months. I guess I started it and then forgot about it. I also kind of failed at taking pictures before or during, so all you get is the after shot. Sorry.

The cupboard above the ovens is a hazard. Whenever I want something out of there, I have to either take a bunch of other things out as well or risk having cookie sheets and roasting pans come crashing down on me. It's a large, deep, wonderful cupboard, but it only has one shelf. Since most of the things we put in there are relatively flat, it means we get large piles of pots and pans, making it difficult to get to the thing you want.

For probably at least a couple of years, every now and then I'd say to Zach, "we should get some sort of extra shelf to put in the middle of this cupboard." Zach would agree, and then we'd both forget about it for awhile. Then, when we got our bathroom cabinet installed, it came with extra pegs for holding the shelves. Since this is the same type of cabinet as in our kitchen, the pegs were the right fit there. It still took several months, but I finally got around to building an extra shelf for the over-the-oven cabinet.

First, I took everything out of the cabinet and measured. It was a little tricky because there's some sort of box (probably electrical stuff) in the back of the cabinet that I'd have to make a cut-out for. Then I went to the garage to see if I had any extra boards that were big enough to use. I did have a piece of MDF that was big enough, but MDF is super heavy. Not only did I not want to lift that heavy piece up awkwardly high over my head to install as a shelf, I wasn't confident in the little pegs' ability to support that much weight. So I went to Home Depot in search of a light-weight board. 

I was planning to get plywood, but first I checked out the hobby wood section, just in case, and found exactly what I needed -- 3/4" pine, 2' x 4'. I took it home and cut it to size. Before finishing it, I did a test fit to make sure I had measured right, and it fit perfectly! I had also gotten a light stain with the idea of attempting to match the inside of the cabinet. Well, I put the stain on the wood with a rag, and it totally did not match at all. However, it won't be very visible, so I'm not too concerned. Since the stain was already quite a bit darker than the interior of the cabinet, I only did one coat of stain. Then I did lots of coats of spray polyurethane.

And now, every time I open that previously horrible cabinet, I smile :-)


Thursday, January 1, 2015

cord clean-up

Confession: I'm messy. Many of my friends will scoff at this admission because in some parts of my life, I'm exceptionally organized. However, I tend to not put things away. I'm especially bad in the living area, where I use my laptop, tablet, phone, books, etc and then leave them strewn about the coffee table. One of the things that bothers me about this situation is that, having all these electronics, I need power cables for all of them, and these cables feel more messy to me than all the books and magazines and papers piled up. All these cables are also annoying when it comes to traveling. They get all tangled up, even trying to put them all in separate bag pockets. So I finally made a little holder for some of my cables, to keep them tidy. I found the idea and design pattern at www.brit.co/cord-roll/.

I started off at Joann Fabric and picked out some faux leather (aka vinyl, but "faux leather" sounds way fancier). I liked this blue one.


I cut the fabric according to the design instructions, using my carpenter's square to help draw the angles for the end.


Then I cut the slits to tuck the cords in. The directions didn't really specify the size of these slits. I made mine 0.5" tall and various widths. The first one, shown directly below, I made 1.5" wide for my camera cord. I actually started it narrower, tested it with the cord, and decided it needed to be a bit wider. That's really how I did all the slits -- estimated a starting point, checked it with the cord I planned to put there, then widened as needed. The other slits all ended up being 2", and there's 0.5" between them all.


Next I put the snaps on. They were super easy. I did the end one first, then put all the cords in and rolled the holder up to see where the other half of the snap needed to go. Conveniently, it went right in between the two middle slots.


Here's the holder with all the cords in it. From left to right, they're for my Kindle, phone, iPad, and camera. The phone and iPad also have big adapters to go from the USB connector to an outlet plug. Those were too big to fit in this holder, so I might end up making another one that's bigger and can hold those too. However, the adapters are also simple to detach and don't have pieces to get tangled up with things, so just having them loose in a bag isn't that big of a deal either.


And here it is all rolled up. I used it when we went out of town for Christmas, and it was awesome. Not having the frustration of tangled cords made me very happy :-)


Saturday, September 27, 2014

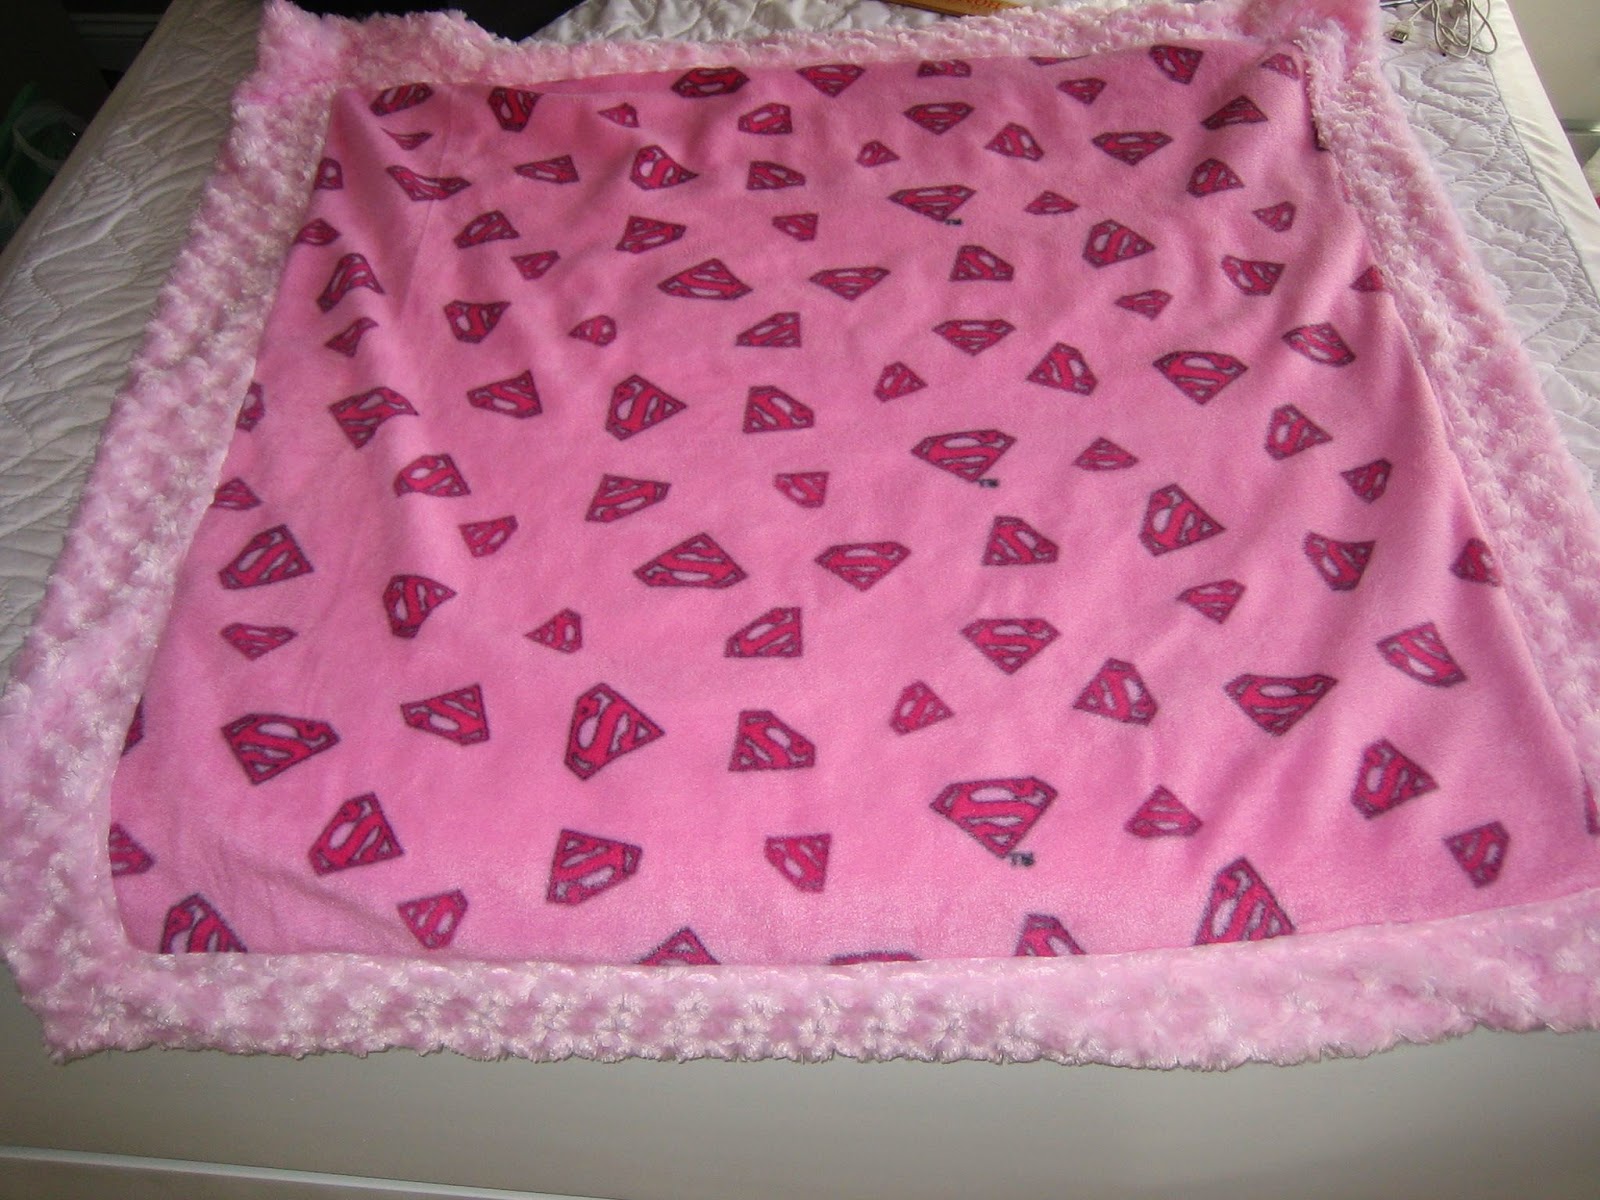
a supergirl blanket for a supergirl baby

Wow, I hadn't posted anything in quite awhile, and now three posts in a row! I have been busy lately 
:-) But this post will be short, since I've already posted about similar projects here and here. 

Our very dear friends welcomed a new baby girl a few weeks ago. This would normally be a very happy thing, which it was, but she came about 3.5 months early, so along with the joy came much anxiety for both her short- and long-term health. She's had a few surgeries already, but seems mostly in reasonable health for a baby born so small. We've been helping them out as much as possible, and they're having family come and visit.

Usually, I've made blankets for my friends' babies to go with their shower theme, but since this baby came before we'd had a chance to plan a shower for her, that didn't work out. However, I really wanted to make her something now that she's arrived. 

At first, I thought of making a tiny blanket, since she's so tiny, out of leftover bits from other blankets I'd made. However, I didn't have tons of leftovers, even for a tiny blanket, plus nothing was really grabbing my love. Then the idea of Supergirl popped into my head. This seemed especially perfect for this tiny little fighter. I immediately went on an Internet quest for Supergirl flannel or fleece. This turned out to be surprisingly difficult to find; in fact, I only was able to really find one place that had it -- Hancock Fabrics. I ordered 1 yard, and then waited anxiously for it to arrive.


The other blankets I made had a micro-fleece back and edges with flannel in the middle of the front. Since the Supergirl fabric was fleece, my initial plan was to use that as the back and edges and get a plain either dark pink or purple flannel for the middle front. In fact, I even purchased purple flannel and JoAnn when I was there getting fabric for Zach's birthday present. However, once the Supergirl fleece arrived and I laid the two fabrics out together, it just wasn't doing it for me. I thought about putting a smaller square of the fleece in the center of the front, surrounded by the purple flannel, but that didn't seem right either. So I changed my plan to instead put the Supergirl fleece in the front and get a micro-fleece for the back, like I had done with the other blankets. I excitedly took a small piece of the fleece and went to Hobby Lobby to check out their selection. I was kind of planning to get purple to tone down the pink-ness, but I didn't really like the look of that. Instead, I chose a light pink rose-patterned micro-fleece. The rose pattern is subtle and mostly just gives it a fluffier look. The fabric was super sheddy, but once I washed it, it was fine.

I cut the micro-fleece to 4'x4' and the fleece to 3'x3'. The freshly cut raw edges of the micro-fleece started shedding again, so I washed it again. Then I followed the same instructions as my first blanket post, and voila!


I hope my friends like it and don't think it's to pink! It will be awhile before the little baby can have the blanket in bed with her, but until then, it can sit in her NICU room and inspire her to grow big and strong and bring optimism to her parents.

standing in the hall of fame

Another year has gone by, and it's time for Zach's birthday again. He heard a few weeks ago that, coincidentally on his actual birthday, he would be inducted into his high school's hall of fame! In light of this, it seemed especially appropriate that I frame some of his track medals for his birthday. This is something that I've had in mind for awhile. He's had one shadow box of medals hanging in our room, but it's been looking pretty sad. Unfortunately, I neglected to take a picture of it, so you'll just have to trust me. The medals were attached to the cardboard back with velcro, which peeled off on some of the larger medals. My initial plan was to just figure out a better way to attach the medals, but when I took the frame down and looked at it, many of the little bendy parts that hold the back into the frame had broken off, so I wasn't convinced of its long-term last-ability. Since I wanted to frame more medals, I just got an extra to replace that one. 

Zach showed me the boxes of his medals. He identified the most prestigious ones and helped me sort them by years.


I had some foam left over from my cushion project, so I decided to use that to pin the medals to. I borrowed an electric knife to cut up the foam. I didn't do a very good job of cutting even strips, but once they got covered with fabric, you couldn't really tell. 


Speaking of fabric, I covered one with leftover fabric from my curtains. For the other three, I picked up some red, white, and blue fabric to match the medal ribbons, most of which I removed. I thought that not having all those ribbons would give the displays a cleaner look, but I still wanted to pay homage to them. I also ended up incorporating one ribbon in each of the shadow boxes. 

I wrapped the foam pieces in the fabric and hot-glued it in place. I also glued on some of the medal ribbons. 


Then I pinned on the medals. Pretty simple :-) 


The one will get hung back up in our bedroom, and the other three will be hung in Zach's very large walk-in closet. Maybe one day I'll do all the rest of his medals too, but he does have a lot! 

And here's Zach getting his plaque for the hall of fame. There was a little ceremony at the school Friday evening with dinner, and then he got to be introduced before the homecoming game on Saturday.


Thursday, September 25, 2014

why i believe in animal behaviorists

I wrote here about our cat problems and how I had a pet behaviorist come out to the house for a consultation. The primary things we concluded were that Dodger likes to go out in the open where he has infinite escape routes should his little brother decide to come stare at him and that there was a possibility that the cats didn't like their litter anymore. She made a few recommendations: move all the boxes back upstairs to the cat room, add another box, put at least one box right in the middle of the room, and replace the litter in a couple of the boxes with potting soil.

After some time, I determined that Dodger was not at all interested in the soil and that, although Oliver would use it, he didn't seem to have a significant preference over the clay litter. I would eventually switch those boxes back to the litter we used to use for the first 3-4 years of the cats' lives, which is a corn-based litter. We had switch from the World's Best Cat Litter to Cat Attract at some point after Dodger starting having problems. At the current time, Dodger again has little interest in the corn-based litter, but Oliver will use either.

After replacing the carpet on the stairs and moving all the boxes to the cat room, we no longer had a problem with Dodger misbehaving. Oliver was another matter. In fact, he suddenly got worse, peeing in the living room and dining room. Every night, I would walk around the dark house with a blacklight to figure out if and where he had been bad that day. Due to the sudden change in behavior from Oliver, I took him to the vet. She didn't find anything obviously wrong with him, but had me bring him back a couple of weeks later for stomach x-rays, which turned up nothing. Having ruled out health problems, I emailed Mary again to schedule another visit. 

We walked around the house again, with me pointing out all the areas of Oliver's transgressions. I described in detail his changes in behavior, including both the peeing and the fact that he no longer sat on my lap and snuggled in the evenings like he used to. After all this discussion, Mary said, do you think he just needs a little box down here? One of the key pieces of information seemed to be that, much of the time, I caught Oliver in the act of misbehaving; he was in the living room, hanging out, and instead of climbing upstairs to use the litter box, he would just pee on the floor. I was hesitant at first at the idea of putting a litter box on the living room/dining room floor, as I was afraid that Dodger would then start going on the floor nearby, as had been the original problem with having a litter box in the powder room. I also knew Zach would hate the idea of having a litter box anywhere out in the open or near where we might eat. However, after some more talking it out with Mary, we came up with the plan to put a tiny litter box that Dodger could not possibly fit in, filled with the corn-based litter that Dodger doesn't like, in the corner under Oliver's cat tree where Dodger doesn't like to go. 

The next day, I went to Target to buy a tiny litter box. I had the dimensions of the cat tree base where the box would go. I was planning to get a small storage box, but ended up finding a silverware box that was the perfect size.


It's been over a month since getting the new tiny litter box. Since then, Oliver has only had one accident, and that was because I failed to clean his tiny litter box, so he went on the floor right next to it. So as long as I keep on top of cleaning Oliver's special box, I think we're going to be happy cat parents. I am so relieved to finally have this under control. It had gone on for so long, and I had tried so many things before calling in Mary. When I first got Oliver his special box, I was still checking around with the blacklight every night. Not finding pee seemed so improbable, it was hard to believe the box was actually working. I didn't want to get my hopes up at first, but it's been long enough now that I'm willing to call this solved. 

I'm so grateful to Mary. While, in the end, her solutions seem pretty simple, I couldn't have arrived at them on my own. For all the Internet research I had done, all cats are different, and things get more complicated when you have two cats, each with different preferences. It seemed like whenever I'd make a change that was better for one cat, things got worse with the other. Now we have two happy cats and two happy cat parents! Thanks, Mary!

Friday, August 15, 2014

a new place for coats

This is another project that has been stewing around in my head for a long time. I really like wall-hung coat racks, and I like the idea of a place to display some little things in the entryway, so when I stumbled upon this post, it was just the sort of coat-hanging decorative shelf I wanted. And then it took me several months to get around to actually making it. Partly it took me so long because I don't own the necessary tools, and I don't like to impose on my friend too much, mostly because he usually helps me with my projects, which is really nice, but I know he has more than enough of his own house projects to work on. Also, other things kept coming up that seemed more time-critical. However, as mentioned here, I had my friend's tools living in my garage for awhile, so I finally got around to this project. The project instructions I found online consist of a large piece of crown moulding, two boards, and a smaller piece of moulding for a decorative bottom. 

The first thing to do, of course, was to pick out the moulding that I would use. There was a lot of looking at existing moulding in our house, on door frames, baseboards, and the fireplace mantle. Then there was a lot of looking at options on homedepot.com. I picked out a 9/16" x 3 5/8" crown moulding for the top of the shelf. It looked good in the picture and was available in the store. A lot of the moulding options online are not available in stores, which I find very annoying because moulding is, I feel, one of those things that is better to see in person. I went to the store and found that, then walked around the moulding aisles looking at all the options for a smaller moulding for the bottom. There actually weren't that many choices, in the end, so I just picked one.

The tutorial indicates that the top shelf board should have a rounded front edge. It briefly mentions cutting or sanding the edge to make this. I didn't have appropriate tools for cutting it, and sanding sounded like a lot of work, so instead I bought a piece of half-round moulding and glued and nailed it to the edge of my board.


Next, I glued and nailed the back piece to the shelf. It seems I was really focused on this project and forgot to take many pictures. I apologize. Next, I primed all the wood. The crown and bottom moulding pieces were pre-primed, so I primed all the bare wood before attaching those pieces.

I found this video that shows how to cut crown moulding to get the correct mitered angles. Basically, you set the miter saw at 45 degrees and hold the moulding as if you were holding it against the wall, only upside-down. This turned out to be really hard. I couldn't seem to get uniform cuts so the corners would line up nicely. When my dad was out helping with the stairs (which you can read about here and here), he helped me make a little jig to hold the moulding in place to get more even cuts. Then I was extra glad my dad was there because gluing and nailing the crown pieces together turned out to be a two-person job. My dad put glue on two pieces and held them together while I used my 23-gauge pin nailer to put a couple nails in to help hold things together while the glue dried. Then Dad helped me hold things in place again while I used my 18-gauge brad nailer to attach the crown to the top and back of the shelf. Things weren't quite square, so there were some minor gaps. At first, I thought I could cover it up during the painting process, but in the end, I ran a line of caulk around all the seams where the crown met the shelf.

After painting everything with the same white gloss I used on our trim, it was time to attach the shelf to the wall. I used a stud-finder to locate and mark the studs. I had hoped I could get things to line up such that the coat hooks could cover up the screws holding the shelf to the wall, but no such luck. I used 2.5" #14 wood screws. Zach held the shelf in place while I drilled pilot holes and put in the screws. We couldn't get the screws to go in flush with the wood, so I borrowed a special countersink drill bit from my friend and went back and redid all the holes.


The picture above only shows four screws, but I added two more in the middle stud. After the screws were all in slightly below flush with the wood, I filled over them with wood putty. I had to do a couple of coats to get the holes filled in well. After that was all dry, I painted over the holes for a seamless look. 

I ended up getting the coat hooks on amazon.com. I looked at Home Depot and Target, but they had pretty limited selections, and I didn't see anything that I like very much. It was annoying to have to put my project on hold until the hooks arrived, but it was worth it. I marked the screw holes for the hooks before putting the shelf on the wall, which made it easy to lay them all out, measure, and get them all aligned properly. Then after the shelf was screwed to the wall, it was just a matter of drilling pilot holes and screwing the hooks on.


This project definitely goes in the category of more work than originally anticipated, mainly due to the crown moulding. I'm really pleased with how it all turned out, though it has made me less interested in any other crown-related projects for awhile!