"I love my cats because I love my home, and little by little they become its visible soul." Jean Couteau

Saturday, September 27, 2014

a supergirl blanket for a supergirl baby

Wow, I hadn't posted anything in quite awhile, and now three posts in a row! I have been busy lately 
:-) But this post will be short, since I've already posted about similar projects here and here

Our very dear friends welcomed a new baby girl a few weeks ago. This would normally be a very happy thing, which it was, but she came about 3.5 months early, so along with the joy came much anxiety for both her short- and long-term health. She's had a few surgeries already, but seems mostly in reasonable health for a baby born so small. We've been helping them out as much as possible, and they're having family come and visit.

Usually, I've made blankets for my friends' babies to go with their shower theme, but since this baby came before we'd had a chance to plan a shower for her, that didn't work out. However, I really wanted to make her something now that she's arrived. 

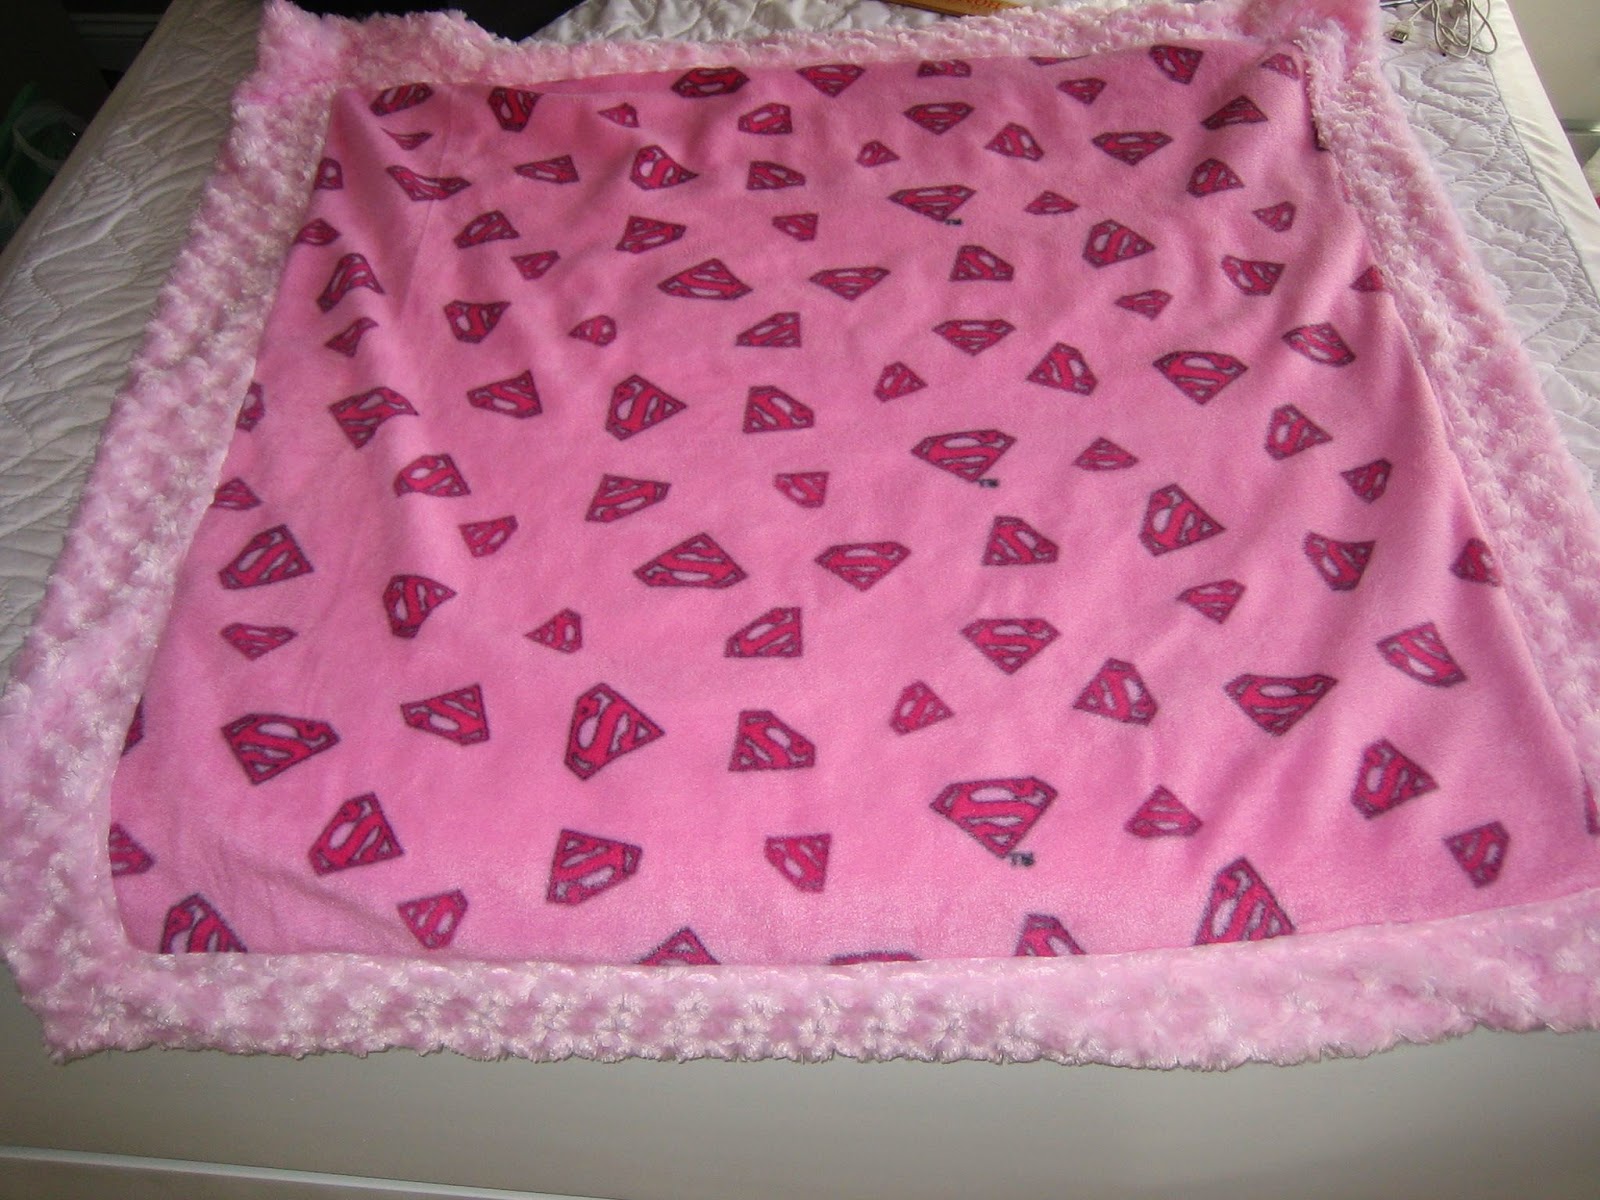
At first, I thought of making a tiny blanket, since she's so tiny, out of leftover bits from other blankets I'd made. However, I didn't have tons of leftovers, even for a tiny blanket, plus nothing was really grabbing my love. Then the idea of Supergirl popped into my head. This seemed especially perfect for this tiny little fighter. I immediately went on an Internet quest for Supergirl flannel or fleece. This turned out to be surprisingly difficult to find; in fact, I only was able to really find one place that had it -- Hancock Fabrics. I ordered 1 yard, and then waited anxiously for it to arrive.


The other blankets I made had a micro-fleece back and edges with flannel in the middle of the front. Since the Supergirl fabric was fleece, my initial plan was to use that as the back and edges and get a plain either dark pink or purple flannel for the middle front. In fact, I even purchased purple flannel and JoAnn when I was there getting fabric for Zach's birthday present. However, once the Supergirl fleece arrived and I laid the two fabrics out together, it just wasn't doing it for me. I thought about putting a smaller square of the fleece in the center of the front, surrounded by the purple flannel, but that didn't seem right either. So I changed my plan to instead put the Supergirl fleece in the front and get a micro-fleece for the back, like I had done with the other blankets. I excitedly took a small piece of the fleece and went to Hobby Lobby to check out their selection. I was kind of planning to get purple to tone down the pink-ness, but I didn't really like the look of that. Instead, I chose a light pink rose-patterned micro-fleece. The rose pattern is subtle and mostly just gives it a fluffier look. The fabric was super sheddy, but once I washed it, it was fine.

I cut the micro-fleece to 4'x4' and the fleece to 3'x3'. The freshly cut raw edges of the micro-fleece started shedding again, so I washed it again. Then I followed the same instructions as my first blanket post, and voila!


I hope my friends like it and don't think it's to pink! It will be awhile before the little baby can have the blanket in bed with her, but until then, it can sit in her NICU room and inspire her to grow big and strong and bring optimism to her parents.

standing in the hall of fame

Another year has gone by, and it's time for Zach's birthday again. He heard a few weeks ago that, coincidentally on his actual birthday, he would be inducted into his high school's hall of fame! In light of this, it seemed especially appropriate that I frame some of his track medals for his birthday. This is something that I've had in mind for awhile. He's had one shadow box of medals hanging in our room, but it's been looking pretty sad. Unfortunately, I neglected to take a picture of it, so you'll just have to trust me. The medals were attached to the cardboard back with velcro, which peeled off on some of the larger medals. My initial plan was to just figure out a better way to attach the medals, but when I took the frame down and looked at it, many of the little bendy parts that hold the back into the frame had broken off, so I wasn't convinced of its long-term last-ability. Since I wanted to frame more medals, I just got an extra to replace that one. 

Zach showed me the boxes of his medals. He identified the most prestigious ones and helped me sort them by years.


I had some foam left over from my cushion project, so I decided to use that to pin the medals to. I borrowed an electric knife to cut up the foam. I didn't do a very good job of cutting even strips, but once they got covered with fabric, you couldn't really tell. 


Speaking of fabric, I covered one with leftover fabric from my curtains. For the other three, I picked up some red, white, and blue fabric to match the medal ribbons, most of which I removed. I thought that not having all those ribbons would give the displays a cleaner look, but I still wanted to pay homage to them. I also ended up incorporating one ribbon in each of the shadow boxes. 

I wrapped the foam pieces in the fabric and hot-glued it in place. I also glued on some of the medal ribbons. 


Then I pinned on the medals. Pretty simple :-) 


The one will get hung back up in our bedroom, and the other three will be hung in Zach's very large walk-in closet. Maybe one day I'll do all the rest of his medals too, but he does have a lot! 

And here's Zach getting his plaque for the hall of fame. There was a little ceremony at the school Friday evening with dinner, and then he got to be introduced before the homecoming game on Saturday.


Thursday, September 25, 2014

why i believe in animal behaviorists

I wrote here about our cat problems and how I had a pet behaviorist come out to the house for a consultation. The primary things we concluded were that Dodger likes to go out in the open where he has infinite escape routes should his little brother decide to come stare at him and that there was a possibility that the cats didn't like their litter anymore. She made a few recommendations: move all the boxes back upstairs to the cat room, add another box, put at least one box right in the middle of the room, and replace the litter in a couple of the boxes with potting soil.

After some time, I determined that Dodger was not at all interested in the soil and that, although Oliver would use it, he didn't seem to have a significant preference over the clay litter. I would eventually switch those boxes back to the litter we used to use for the first 3-4 years of the cats' lives, which is a corn-based litter. We had switch from the World's Best Cat Litter to Cat Attract at some point after Dodger starting having problems. At the current time, Dodger again has little interest in the corn-based litter, but Oliver will use either.

After replacing the carpet on the stairs and moving all the boxes to the cat room, we no longer had a problem with Dodger misbehaving. Oliver was another matter. In fact, he suddenly got worse, peeing in the living room and dining room. Every night, I would walk around the dark house with a blacklight to figure out if and where he had been bad that day. Due to the sudden change in behavior from Oliver, I took him to the vet. She didn't find anything obviously wrong with him, but had me bring him back a couple of weeks later for stomach x-rays, which turned up nothing. Having ruled out health problems, I emailed Mary again to schedule another visit. 

We walked around the house again, with me pointing out all the areas of Oliver's transgressions. I described in detail his changes in behavior, including both the peeing and the fact that he no longer sat on my lap and snuggled in the evenings like he used to. After all this discussion, Mary said, do you think he just needs a little box down here? One of the key pieces of information seemed to be that, much of the time, I caught Oliver in the act of misbehaving; he was in the living room, hanging out, and instead of climbing upstairs to use the litter box, he would just pee on the floor. I was hesitant at first at the idea of putting a litter box on the living room/dining room floor, as I was afraid that Dodger would then start going on the floor nearby, as had been the original problem with having a litter box in the powder room. I also knew Zach would hate the idea of having a litter box anywhere out in the open or near where we might eat. However, after some more talking it out with Mary, we came up with the plan to put a tiny litter box that Dodger could not possibly fit in, filled with the corn-based litter that Dodger doesn't like, in the corner under Oliver's cat tree where Dodger doesn't like to go. 

The next day, I went to Target to buy a tiny litter box. I had the dimensions of the cat tree base where the box would go. I was planning to get a small storage box, but ended up finding a silverware box that was the perfect size.


It's been over a month since getting the new tiny litter box. Since then, Oliver has only had one accident, and that was because I failed to clean his tiny litter box, so he went on the floor right next to it. So as long as I keep on top of cleaning Oliver's special box, I think we're going to be happy cat parents. I am so relieved to finally have this under control. It had gone on for so long, and I had tried so many things before calling in Mary. When I first got Oliver his special box, I was still checking around with the blacklight every night. Not finding pee seemed so improbable, it was hard to believe the box was actually working. I didn't want to get my hopes up at first, but it's been long enough now that I'm willing to call this solved. 

I'm so grateful to Mary. While, in the end, her solutions seem pretty simple, I couldn't have arrived at them on my own. For all the Internet research I had done, all cats are different, and things get more complicated when you have two cats, each with different preferences. It seemed like whenever I'd make a change that was better for one cat, things got worse with the other. Now we have two happy cats and two happy cat parents! Thanks, Mary!

Friday, August 15, 2014

a new place for coats

This is another project that has been stewing around in my head for a long time. I really like wall-hung coat racks, and I like the idea of a place to display some little things in the entryway, so when I stumbled upon this post, it was just the sort of coat-hanging decorative shelf I wanted. And then it took me several months to get around to actually making it. Partly it took me so long because I don't own the necessary tools, and I don't like to impose on my friend too much, mostly because he usually helps me with my projects, which is really nice, but I know he has more than enough of his own house projects to work on. Also, other things kept coming up that seemed more time-critical. However, as mentioned here, I had my friend's tools living in my garage for awhile, so I finally got around to this project. The project instructions I found online consist of a large piece of crown moulding, two boards, and a smaller piece of moulding for a decorative bottom. 

The first thing to do, of course, was to pick out the moulding that I would use. There was a lot of looking at existing moulding in our house, on door frames, baseboards, and the fireplace mantle. Then there was a lot of looking at options on homedepot.com. I picked out a 9/16" x 3 5/8" crown moulding for the top of the shelf. It looked good in the picture and was available in the store. A lot of the moulding options online are not available in stores, which I find very annoying because moulding is, I feel, one of those things that is better to see in person. I went to the store and found that, then walked around the moulding aisles looking at all the options for a smaller moulding for the bottom. There actually weren't that many choices, in the end, so I just picked one.

The tutorial indicates that the top shelf board should have a rounded front edge. It briefly mentions cutting or sanding the edge to make this. I didn't have appropriate tools for cutting it, and sanding sounded like a lot of work, so instead I bought a piece of half-round moulding and glued and nailed it to the edge of my board.


Next, I glued and nailed the back piece to the shelf. It seems I was really focused on this project and forgot to take many pictures. I apologize. Next, I primed all the wood. The crown and bottom moulding pieces were pre-primed, so I primed all the bare wood before attaching those pieces.

I found this video that shows how to cut crown moulding to get the correct mitered angles. Basically, you set the miter saw at 45 degrees and hold the moulding as if you were holding it against the wall, only upside-down. This turned out to be really hard. I couldn't seem to get uniform cuts so the corners would line up nicely. When my dad was out helping with the stairs (which you can read about here and here), he helped me make a little jig to hold the moulding in place to get more even cuts. Then I was extra glad my dad was there because gluing and nailing the crown pieces together turned out to be a two-person job. My dad put glue on two pieces and held them together while I used my 23-gauge pin nailer to put a couple nails in to help hold things together while the glue dried. Then Dad helped me hold things in place again while I used my 18-gauge brad nailer to attach the crown to the top and back of the shelf. Things weren't quite square, so there were some minor gaps. At first, I thought I could cover it up during the painting process, but in the end, I ran a line of caulk around all the seams where the crown met the shelf.

After painting everything with the same white gloss I used on our trim, it was time to attach the shelf to the wall. I used a stud-finder to locate and mark the studs. I had hoped I could get things to line up such that the coat hooks could cover up the screws holding the shelf to the wall, but no such luck. I used 2.5" #14 wood screws. Zach held the shelf in place while I drilled pilot holes and put in the screws. We couldn't get the screws to go in flush with the wood, so I borrowed a special countersink drill bit from my friend and went back and redid all the holes.


The picture above only shows four screws, but I added two more in the middle stud. After the screws were all in slightly below flush with the wood, I filled over them with wood putty. I had to do a couple of coats to get the holes filled in well. After that was all dry, I painted over the holes for a seamless look. 

I ended up getting the coat hooks on amazon.com. I looked at Home Depot and Target, but they had pretty limited selections, and I didn't see anything that I like very much. It was annoying to have to put my project on hold until the hooks arrived, but it was worth it. I marked the screw holes for the hooks before putting the shelf on the wall, which made it easy to lay them all out, measure, and get them all aligned properly. Then after the shelf was screwed to the wall, it was just a matter of drilling pilot holes and screwing the hooks on.


This project definitely goes in the category of more work than originally anticipated, mainly due to the crown moulding. I'm really pleased with how it all turned out, though it has made me less interested in any other crown-related projects for awhile!

Sunday, August 10, 2014

trading carpet, part 2

And now, the conclusion...

I left off the last post with painting the landing with odor-sealing primer. While that was drying, Dad and I got started thinking about the stair treads. We gathered all the smallest pieces of flooring and measured how long they needed to be for each step. Since most of these small pieces would be cut from larger pieces, most of them would lose their tongue, which is supposed to fit into the groove in the back of the nose. Dad figured we could use the table saw to shave off part of the plank to create a tongue. I didn't get any pictures of this, so I'll just try to describe it. There should still be tongue sticking out on the side, so set the table saw height so the saw just comes to the bottom edge of that tongue. Measure how deep your tongue should be and set up a gate so you can get a nice, straight cut. Then just run the plank through at that depth, then slightly less and slightly less until you've shaved off all the way to the end. Now you have half a tongue. Then turn your plank upside down, reset the saw height as the two sides aren't necessarily equal, and do it again.

I worked on making tongues and Dad took the newly-tongued pieces and trimmed them to the correct length on the miter saw. When measuring the length, be sure not to include the tongue, or your piece will end up too short!

Once we had all the pieces cut, we laid them out on the step with the nose. Even with careful measuring and cutting, the pieces weren't all exactly the same length. This was OK since the step wasn't perfectly uniform depth all the way across. We did a lot of musical chairs slots to get the best fit of all pieces across the entire step. With all the pieces in, there was a gap at one side that was too narrow for a full plank-width to fit, so the last piece on each stair had to be custom cut to the necessary width.


Then it was time for gluing! The planks on the stair treads didn't get nailed in, just glued (with liquid nails, so in a sense, I guess they got nailed). After the planks were glue down, the stair noses got glued in. Then we taped the noses to the treads, both as a little extra security while they dried and to remind us not to walk on the stairs. It's important not to walk on the stairs for at least 24 hours while the glue sets. The glue can continue to harden and strengthen for up to a week, so, since we only had those couple of stairs, we stayed off of them for a whole week.


Now it was finally time for the feature presentation -- the landing! First, we cut and laid the underlayment. Underlayment helps keep the wood from creaking. It only came in a HUGE roll, but I figure I'll use it eventually when I get around to converting the rest of the stairs to hardwoods, which is definitely in the long-term plans.


Then we started planning the landing planks. We started by finding the longest pieces we had. We had two that were long enough to span the entire landing, so we put one of those near either side. Then we filled in with alternating sizes to give it the right sort of random offset pattern that wood floors have. The spacing of the planks on the landing didn't work out to match up perfectly with the planks in the powder room, leaving a narrow gap. More on that later. After we had our plan in place, we cut pieces as needed to get everything to fit just right and dry fit them one more time. Then we took most of the planks out, keeping them in order, and it was time to start nailing!

We started at the side next to the stairs, opposite the powder room, but we didn't start with the planks right up next to the stairs. There's a little jutting in part, and we thought it would be better to have the long plank fit next to there perfectly, instead of cutting a notch in it, which we would have to do if we started right up against the step. Also, the step wasn't perfectly square and level, so we'd have to do some fiddling with the pieces there for them to fit properly and line up with the truly straight planks of the rest of the landing. We worked our way across toward the powder room, fitting the planks in, tapping them into a nice, snug fit with a rubber mallet, and nailing them with the floor nailer. Eventually, we got too close to the wall to fit the floor nailer in, so then we just surface-nailed with my 16-gauge finish nailer. Then we custom-cut the pieces to go up next to the stair and glued them in place.


As you can see in the photos above, there was a gap between the end of the landing wood and the start of the powder room wood. It was pretty narrow, less than an inch in most places, but also not uniform. Instead of trying to custom cut and fit and glue in plank pieces, we got a matching T transition piece at Home Depot. We just set it in the gap and surface nailed it in place. It sticks up a little bit, but it blends in well and is barely noticeable. 


Now that the floor was in, we could put the baseboard back on and add shoe moulding. Now that the baseboard was going on top of the floor, we had to cut off the height of the floor, about 3/4". We did that with the table saw, then nailed it all back in place with the 16 gauge finish nailer. The baseboards had gotten a bit scuffed up taking them out, so I gave them all a fresh coat of the trim paint the builders had left for us. 


I had taken off a couple of pieces of the existing shoe moulding for installation of the bottom riser, so I took that to Home Depot to find a match. I added the moulding all around the landing and also along the bottom step to have continuity with what was already there.


And here are the stairs and landing with everything finished and the blue tape removed. I love how it looks, and we haven't had anymore cat problems there, so I'm glad we did it. Thanks for all the help, Dad!!


Thursday, July 24, 2014

trading carpet, part 1

I wrote here about our cat problems and how I had plans to rip up the carpet on the stair landing and replace it with hardwood. I'm sure you've all been waiting on the edges of your seats since then, eagerly anticipating the post where I would share that adventure. Well, you can relax because that post is finally here. However, a word of warning: this is a pretty long post; there was a lot to do! I'll actually split it into two posts, one for pre-floor installation activities and one for floor installation and finishing.

There are a couple of reasons why this project was so long in coming. One was that I decided it would be best to have my dad come help me, since he is really good at house stuff and has some experience laying hardwoods at his house. Another reason was that I was trying to train the cats to dislike the landing before installing the nice new floor in the hope that, once the new floor was in, they would not return to their previous behavior. 


Back in April, I ripped up the carpet and padding. That was the easy part. Then I had to pull off all the tack strips, which was less easy. For that I used a variety of tools, including a flat-head screwdriver and hammer claw. Then I pulled all the staples out of the subfloor, which was not difficult, but was time-consuming and tedious. For this I primarily used needle-nose pliers, with the occasional use of the flat-head screwdriver to help pry up staples that were too flat against the floor to get a good initial grip with the pliers. 


At this point, we learned the extent of the cat damage. Under blacklight, there was definite staining of the subfloor. Luckily, the damage was not so extreme as to have warped the subfloor. I treated the area with Anti-Icky-Poo, an enzymatic cleaner. Later on in the process, I would treat it with a different enzymatic cleaner, Nature's Miracle, and a home-made solution of hydrogen peroxide and baking soda. In the end, there still seemed to be some visible staining under blacklight, but we just painted it with stain-blocking Kilz oil-based primer and hoped for the best. However, that's getting a little ahead of ourselves.

I also pried off part of the baseboard, which had also sustained some liquid damage. For this, I used a pry-bar. I read online the importance of putting a thin piece of scrap wood behind the pry-bar, so you don't accidentally bust through your drywall when you pry back. I had intended to replace this piece of baseboard, but instead we ended up slicing off the bottom inch or so and installing it back in on top of the hardwood (more on this later).


I then covered the landing, other than a small strip to walk through, with boxes. We buy a lot of things on the Internet, so we have a lot of boxes. This made it more difficult and less desirable for the cats to go on the landing. Oliver still seemed to find some areas for bad behavior, though, so next I added a Glade Sense & Spray. This is a motion-activated air freshener, so when the cats (or we) walked by, it would make a little motor-whirring sound and poof some Hawaiian breeze into the air. The sound definitely startled Dodger, making him very cautious of the landing and not want to linger there. I think the smell and the addition of more boxes helped deter Oliver. However, once the boxes were removed to prepare for installing the new floor, Oliver did pee on the subfloor again. That dampened our spirits, delayed our getting started a bit, and earned both cats a prolonged stay in their cat room until the new floors were completely installed, plus a day or two after.

My dad arrived on a Thursday night in June. We examined the subfloor under blacklight and painted it with my dad's home-brew solution: 0.5 cups of 3% hydrogen peroxide, a drop of liquid dish soap, and 1 teaspoon of baking soda mixed together until dissolved. Whether this destroyed the odors or not, Oliver still peed there Friday, resulting in liberal use of Nature's Miracle by my dad. I had planned to prime the subfloor Friday night, but it had to wait until Saturday, as the subfloor was now quite damp. I put a fan blowing on it all night and still had to finish up with a hair dryer the next day.

While I was at work on Friday, Dad got started on the stairs. The first thing to do was cut off the nose on the existing treads. Since we were going to put the new floor and stair noses on top of the existing treads, the new noses wouldn't sit on there properly with the existing noses still in place. I watched a video online about using a circular saw, but I think my dad used a reciprocating saw. The cut didn't have to be pretty since we'd be covering it up with the new nose anyway. 


Dad also did some checking of the squareness of our stairs. If they weren't square, we'd have to do a bunch of crazy angled cuts to make everything fit in nice and flush. Luckily, our stairs were done well and haven't had much time to settle or warp or whatever, so they are square enough :-)

We also had several emails and texts back and forth about how to do the treads. I had initially planned to do them with the stair planks going horizontally across the tread. However, this would be the opposite direction of the planks on the floor below and the landing above. My dad thought it would be better to either use a solid tread or put the planks vertically on the tread to match the direction on the floor and landing. The reason I originally nixed the idea of a solid tread is that it can be harder to get it to match the hardwoods, since you generally have to just buy an unfinished tread and stain it to match. Rethinking that plan, I did find one that claimed to be the same finish as our floors. However, the solid tread comes with a nose as part of it, but we'd have a different nose for the landing, so we were worried that it might not match that well and would look weird. Given all these possibilities for not quite matching, we decided to stick with the idea of using the planks, but go with my dad's plan of putting the planks the same direction as the floor and landing.

Lastly, Dad cut the stair risers to size. When I got home from work, we installed them. The existing risers weren't at exactly 90 degrees from the treads or perfectly straight across, so we used shims to get the new risers as level as possible. We used my 18-gauge brad nailer to nail the new risers to the shims and original risers. 


The risers were pre-primed, so once they were installed, I painted them. I used leftover white gloss paint the builders had left us that matches all the trim in the house. I also touched up the trim where we had banged it up during riser installation.


Bright and early Saturday morning, Dad and I went to a local equipment rental store and rented a pneumatic flooring nailer. This is a different kind of nailer from the usual brad or finish nail gun, specially designed for nailing tongue and groove flooring. 

We didn't actually get started nailing right away, though. There was a lot of prep work. First, we took the door off the powder room. This gave us better access to the entire landing, including the threshold into the powder room.


I painted the landing with Kilz oil-based stain-blocking primer. I had read that oil-based would work better for sealing in the odors than water-based. I painted it on pretty thick since we didn't want anything coming through.


And that finishes up the pre-flooring-installation fun. Stay tuned... coming soon, floor, baseboard, and shoe moulding installation!


Saturday, June 28, 2014

it's that time of life, i guess

I currently have 5 girlfriends who are pregnant! Two of them are with their second child! Well, as promised here, pregnant friends get baby blankets. I won't go into much detail, since I already did that post, but I wanted to share pictures of my latest sewing adventure.

This blanket is for my friend Cathy, over at Sparks Fly. They decided to decorate the nursery in blue and gray with elephants, which I LOVE. I scoured the Internet for good elephant flannel. I had decided that I wanted to do a more typical checkered quilt pattern this time, but trying to decide from online images what blues and patterns would look good together was tricky. Then I came across these pre-cut squares on Etsy. I figured, if they're sold as a set, the colors must go together. 

When I got the flannel squares, I laid them all out to make sure I liked the look. I debated a little bit, but ended up going with the classic pattern. I sewed the squares together one at a time into strips across, then sewed those strips together. This seemed like a logical thing to do at the time, but in retrospect, I should have pinned all 36 squares together first. This probably would have made the columns line up more evenly. 


After I got all the squares sewn together, I made my way to JoAnn Fabric to get the fabric for the back and edges. For the last blanket I made, I used red minky. I intended to get the same thing in blue, but none of the blue options seemed quite the right shade. Then I spotted another micro-fleece (not sure if it's technically considered "minky" or not) that was just the right blue/gray and super soft. I got 1.5 yards of it. 

At this point, I washed both the micro-fleece and sewn-together flannel squares to shrink them up before sewing them together. I cut the micro-fleece to 48"x48". Then I followed the same instructions I used before (video and text).

This micro-fleece was a little more difficult to work with than the red minky I'd used before. I think that's because it was a bit thicker and fluffier. My new sewing machine definitely does a good job of feeding the fabric. I'm slowly learning to trust it more. 

Anyway, here's the final product. I hope Cathy likes it as much as my other friend liked hers! 


Tuesday, May 27, 2014

a stole for a remarkable minister

If you don't know what a stole is, never fear! A stole is something that ministers generally wear to signify being yoked to God. Although you may never have a need or desire to make a stole, the principles are good for any applique project.

A very good friend of mine (I'll call her E, since this is a surprise, so I didn't check to see if she's OK with me using her name) is a minister in the United Methodist Church. In the UMC, becoming a minister is a pretty extensive process. After three years of seminary (minister school), you (hopefully) get commissioned to be a probationary minister, then after another three years, you (again, hopefully) get ordained. Ordination is kind of like tenure. You're not allowed to wear a stole until you're ordained, and my friend is getting ordained this spring, so of course, I had to make her a stole. 

I'd never made a stole before, but my mom is a minister, and she has a friend who is an amazing quilter and has made a few stoles for my mom. So as soon as I heard that E was approved for ordination, I emailed my mom's friend for any advice. I already had an idea planned of what I wanted the stole to look like, which I mocked up in Gimp (free Photoshop-like program), so I sent her that too. 

Here are the main recommendations:
  • For the main fabric, use something with a bit of body to accommodate the appliques. Avoid lightweight poly/cotton blends and anything containing spandex. Look for fabric used for making pants or skirts, like twill or poplin.
  • The appliques can be a different fabric, but should be 100% cotton.
  • Use Steam-a-Seam 2 to attach the footprint appliques to the main stole fabric
I headed off to JoAnn Fabrics and starting perusing the selection. It left a lot to be desired. I wanted to make the stole green, which is the main color used in the church for all but special occasions. There aren't a lot of options for pants fabric in kelly green, but I eventually came across some green denim. Yes, that's right, I said green denim. I then took my bolt of green denim over to the quilting square section to find some small pieces of various colors for the applique footprints. I really wanted to do all the fabric-picking right then and there, since it's easiest to get colors and patterns that go together that way, instead of ordering things online.

The denim was wide enough that I would be able to get all four pieces out of it. 

  I took all my fabric home, pre-washed it, and started cutting. Well, first I measured everything out for the denim, and then I started cutting. 

The part where the two sides come together in the back was a bit tricky, but I just started with a shallow angle and slowly made it sharper, pinning and trying it out each time, until it seemed to lay nicely.

Next, I printed out my footprint pattern in a couple of different sizes and chose the one that seemed the best. Then it was time for the Steam-a-Seam 2. I followed the directions, tracing the footprint pattern onto one side of the paper, then peeling off the other side, sticking it to the applique fabric, and cutting out the footprint. I did this for all the footprints and laid them out on the denim to get the spacing figured out. I marked the bottom of each print with chalk to remember where they all went. Then I started ironing. The Steam-a-Seam directions said to put a damp piece of cloth over the applique before ironing. At first, I used a towel, but the terry-cloth left little dimples in the applique fabric, so I switched to an old t-shirt. Also, as the denim got wet, the color bled onto the ironing board, so I put an old towel underneath. 

  Once all the appliques were ironed on, it was time for the hard part -- sewing around each applique. I'd done zig-zag stitches before, but they always looked very zig-zaggy, whereas stitching around appliques always looks very smooth and solid. After much Internet research, I went to my sewing machine manual, which, it turns out, has a section on sewing appliques! I probably could have saved myself some surfing time if I had thought to look in the manual first. It's a little bit of trial and error, adjusting the pressure of the presser foot, the main thread, and the bobbin thread, but I soon came up with a combination that seemed to be capable of creating the look I was going for. 

Now it was time for practice. I practiced a lot. Having never done this type of stitching before, it took awhile to get a feel for how to make it work. The key seems to be running the machine sort of fast (not crazy fast, but not snail-slow either) and moving the fabric slowly. This keeps the stitches close together to get that smooth, solid look. After a few practice runs on scrap fabric for the main footprint part, I felt confident enough to go for the real thing. I decided to do all the sole parts first, then go back to the toes, since after much practice, they were still pretty tricky.

I used silver thread to add a little sparkle, and I LOVED the look. For awhile, I debated whether or not I should bother stitching around the appliques, since it would be difficult, it wasn't really necessary due to the Steam-a-Seam, and I thought maybe it looked OK without it. But I'm really glad I did it. It just made everything look a little more finished, plus it added the aforementioned sparkle.


Now for a slight tangent. When I had 2.5 toes left, my sewing machine started jamming. At first I thought it was the bobbin, but I took out all the thread, and it had the same problem. I went to JoAnn and got some sewing machine oil. Using my manual, I opened up and oiled every spot indicated for oiling. It definitely seemed to move better, and I was very optimistic that this had solved my problem. Then I started sewing again. It did better, but it still jammed up some, though I was able to get it going again each time. In this way, I was able to finish the toes, which was very important since it had taken a lot of trial and error to get the settings just right for doing the applique stitching. However, when I tried to switch back to regular straight stitching with regular thread, the jamming continued, and I sadly admitted that my Kenmore Ultra-Stitch 6 had sewed its last stitch. Even though I still had plenty of time before ordination, I was antsy to get the stole finished, so I borrowed my in-laws' sewing machine for the last step of sewing the denim pieces together. It worked OK, but I was used to my machine, and I had trouble getting used to the different feel of theirs. Luckily, there wasn't much more sewing left. 

First, I sewed the two front pieces together and the two back pieces together. Then I sewed the front to the back. This is pretty straight-forward and standard -- put the right-sides facing each other and straight-stitch around, leaving a reasonable-sized opening, through which everything will be pulled to turn it right-side-out. After turning it right-side-out, I hand-stitched the opening closed.

I had initially envisioned writing the names of the churches that have been important to E's spiritual journey in between the feet. However, once it was done, I thought that might seem like too much. I solicited opinions from several friends and the overwhelming vote was to instead write the church names on the back of the stole. That keeps the sentiment without overcrowding the front and detracting from the feet. It also leaves plenty of room for additions as the bishop moves E to new churches over the years. I used a silver Sharpie paint pen to carefully print the names. Then I declared the stole complete. 


Sunday, May 18, 2014

a new home for thread

This was a busy project weekend, working on two projects, plus house cleaning. I'll post about the sewing project soon, when I get it finished. The other project is something I started quite awhile ago, but finally got finished. My good friend with tools brought over his miter and table saws for me to borrow while he's out of town, and I quickly put them to use. 

I'd found this a long time ago and saved it for the future. Well, the future is now. Back in February, I cut the frame and shelves with my new miter box and primed them. I bought the beadboard for the back and then got busy and never got around to cutting it. Now that I have a table saw in my garage, it was a simple thing to cut it to size. 


I made a different size than the project website -- 24" wide x 17" tall. I made five shelves, each 3.25" tall. The beadboard was pre-primed, so after getting it cut, I glued the frame on with wood glue. I clamped it and let it dry for awhile, then put some 1.5" nails in with my brand new nail gun to give it some extra hold. Next I measured the locations for the shelves and did the same with those. 


After letting the glue dry, I put on a coat of white gloss paint. It's paint that was left behind by our house builders as the color of all our molding and doors, so I don't know exactly what it is. I let that dry for several hours since I didn't have more time to work on it Saturday. Sunday, I put a coat of spray polyacrylic on to give it some protection and a bit more gloss. I let that dry for a couple of hours. Then I nailed on some hooks to the back. I've had a box of assorted picture hanging hardware for years; I think it came from Ikea. It was nice to be able to put it to use. I put two hangers on the back, one on each end near the top.


Then I measured and put some nails in the wall, hung the shelf, and put my thread on it. Clearly, I overestimated the amount of thread that I have, but I'm sure my collection will grow as I do more and more projects over the years.