"I love my cats because I love my home, and little by little they become its visible soul." Jean Couteau

Saturday, July 23, 2016

the end of an era

Today I said goodbye to an old friend. Her name is Roberta, and she has been with me since the summer of 2000. Roberta was my first computer, the one I got when I started college. Don't judge; we went through a lot together.


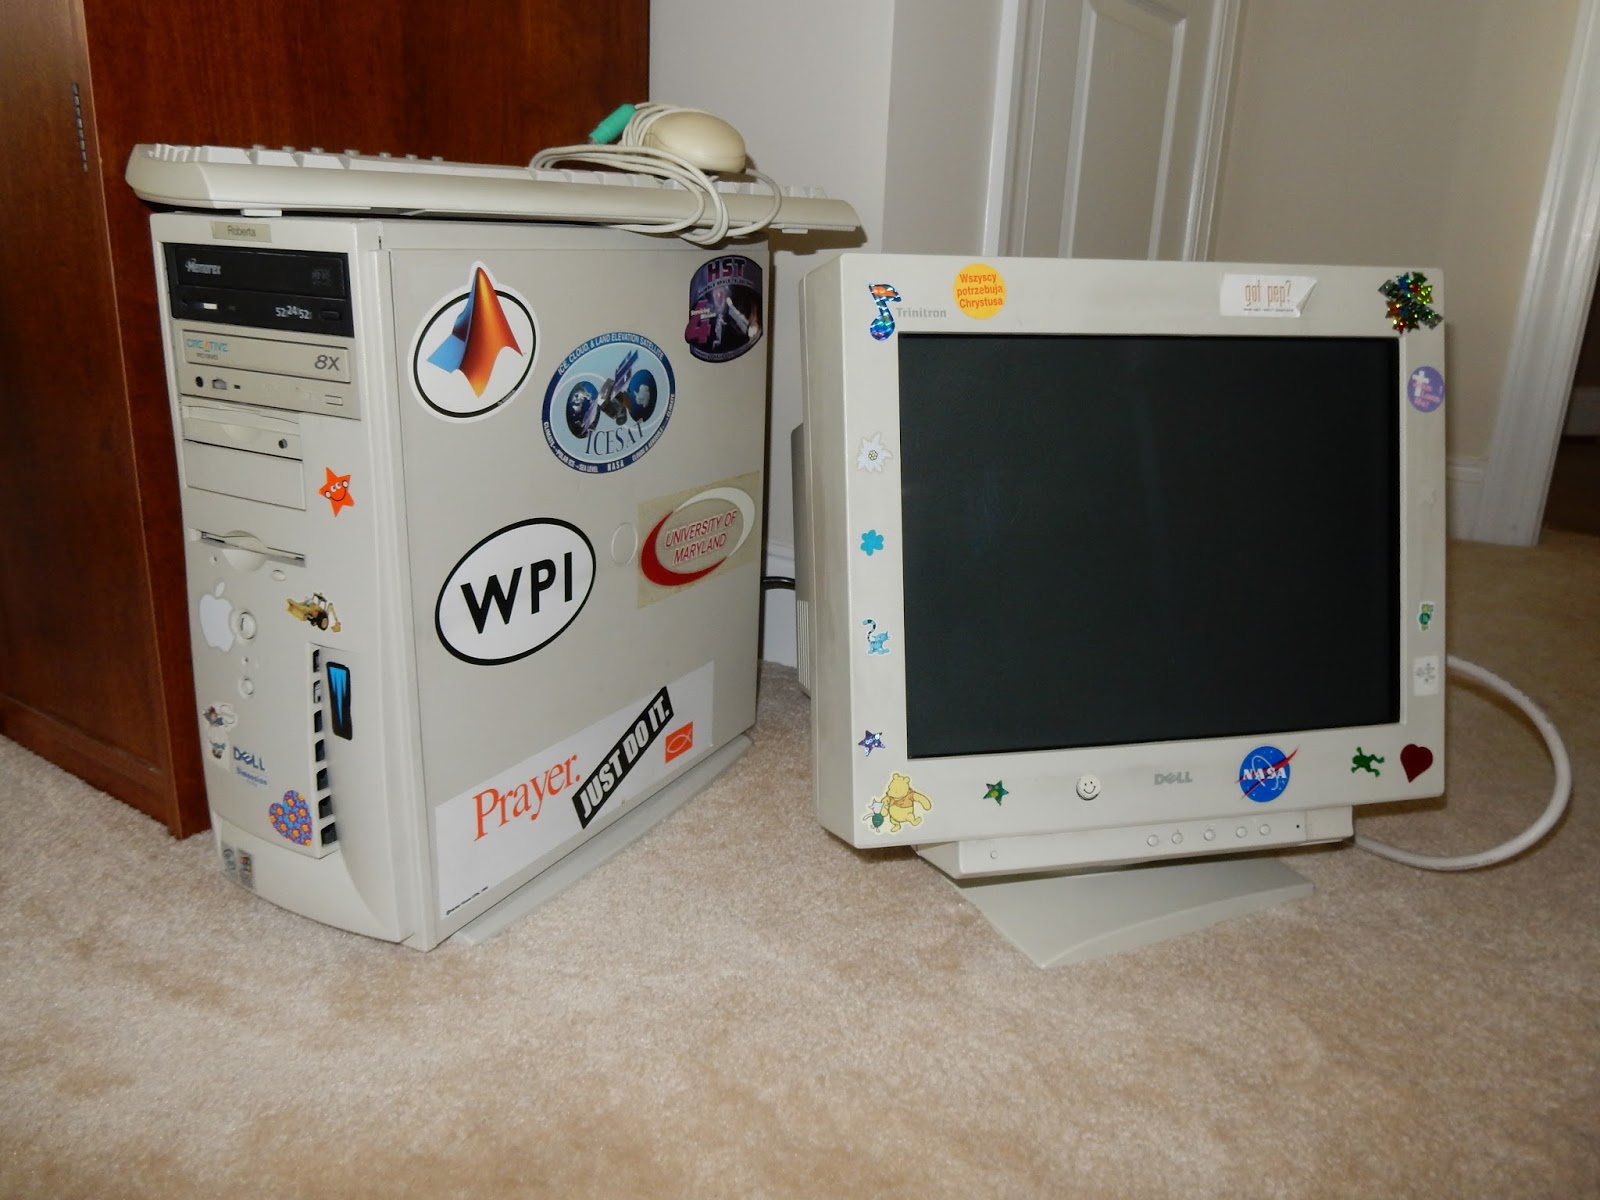
Yes, that's a beige computer with a CRT monitor. That's what computers were like in 2000. Roberta was a Dell desktop and came with a 20GB hard drive loaded with Windows 98. She had a CD-ROM (not writable) drive, a Zip drive, and a floppy drive! When I got to school, and the IT folks were helping get everyone's computers set up on the network, they had to assign the computers a name. They asked what I wanted to name my computer, and I chose Roberta after one of the characters in "Firestar" by Michael Flynn, one of my favorite novels at the time. Roberta was this tough, angsty, Goth, poet teenager, who my alter-ego totally identified with. And so I named my computer after her.


Roberta went through my changes over the years I was in college. I upgraded from Windows 98 to Windows 2000 and eventually to Windows XP. And this was back in the days when upgrading your operating system wasn't just a quick download. It meant backing up all your files because the install from CDs would wipe your hard drive, installing the OS, which took a long time, then reinstalling all your files. 

A friend gave me a small, 4GB hard drive, helped me install Redhat Linux on it, and taught me how to set up my machine to dual-boot. That saved my butt when I installed software that came with one of my textbooks that turned out to be incompatible with Windows 2000 and crashed my system. With dual-booting, I was still able to boot into my Linux drive and access my files to back them up before reinstalling Windows. Later, I replaced the original 20GB hard drive with a bigger, 80GB drive.

One of my sister's grad school friends gave me an old DVD drive he didn't need anymore, so then I could watch movies on my computer, which was exciting. At another point, I replaced the old CD-ROM drive with a CD read-writable drive, so I could burn lots of music CDs to play in my car. 

The first time I opened up my computer, I forget what it was for, probably to add a hard drive, I was so scared. Excited, and scared. As an electrical engineering major, I was super excited to learn about the insides of my computer, especially since I was at school with tons of guys who had already built their own computers from scratch. And I was terrified of breaking it. But I had friends who helped me and taught me, and I didn't break anything, and I learned how to figure things out. I learned practical things that weren't taught in any of my classes.

Now, at home, I prefer laptops, small, portable, grab it and sit on the couch and write emails or scan Facebook or whatever. But you can't take them apart and upgrade them the same way you can a desktop because everything has to be packed in there just so. 

I've kept Roberta for 16 years. For the past several, she's just sat on my desk, collecting dust and various unimplemented plans. I've decided that I might like to actually use my desk sometimes, on the rare occasions when I work from home, and so it was time for Roberta to go, to make room for new things. Because sometimes, you can hold onto the memories, while letting go of the things, and that can be OK.

Sunday, July 17, 2016

hanging and rearranging

Zach and I went on vacation to London a few months ago. I didn't necessarily expect us to get much in the way of souvenirs, so a big part of my plan for the trip was to get some really great classic-shot photos, print them in black and white, and frame them up in our house. Well, mission accomplished. In my personal opinion, I was able to get some pretty great shots. 

I hadn't had photos printed anywhere in a really long time, so I asked some Facebook friends for recommendations. I didn't get many, but one of them was mPix.com, so I went there. I got eight 8x10 mostly black and white photos printed (I did some selective colorization of a few things, like the iconic red telephone booth). Then I went to Michael's where, luckily, they were having a buy one get one free sale and 8x10 wall frames :-D

Then it was a matter of figuring out where to hang all these photos. We don't actually have a lot of big walls available -- most are filled with windows, and the others are covered with big furniture or other art. So I'd been thinking I'd have to split up the photos, but as I was pondering where and how to do that, I had the brilliant idea that I could just MOVE one of our other art pieces off the long wall in our main hall. DUH! 


We'd just move that red painting on the right across the hall to the weird-shaped empty wall above the recycle bin.


I asked Zach what he thought, and he agreed it was a good plan. So then I got to work laying out the photos, figuring out which should go where. Michael's hadn't had 8 frames all the same, so I'd gotten 4 and 4, so I wanted to kind of mix around the frames, so the same ones weren't all grouped together. I'd also done 4 photos with some selective colorization and 4 straight black and white, so I wanted to mix those around too. 


I got a layout I was OK with and then enlisted Zach's help for the hanging. We started at the far right. We measured the height of the entire group and just eye-balled where we wanted that on the wall. The first picture was going to be pretty much centered on that overall height, and we knew where its edge was supposed to be (about even with the light switch plate), so then I just held up the picture and stuck my finger down where the hanger was on the back. I handed Zach the picture while keeping my finger marking the spot, and he handed me a nail. And that's about how we went the whole way, measuring distance between pictures, eye-balling height, getting pretty close with holding the picture up and sticking a finger by the hanger. I didn't care if it was all super precise, as long as the spacing looked generally pleasing at the end. And I think it does :-)


We hung the other picture up on the opposite wall, and now we have more art-covered walls!


Monday, July 4, 2016

more fun with stoles

I know I haven't posted in a long time, but I haven't done any projects in a long time. I've felt plenty busy enough with just life to not bring extra stuff into it. But I finally got around to a project I promised my very good friend back at the beginning of April. Now, I didn't put a time frame on when I would get this done for her, so it's OK that it took 3 months!

My very wonderful friend, E, is a minister. Back when she got ordained, I made her this stole. I'd been thinking that I'd like to make her some more stoles, but I wasn't sure what she had or needed. *Warning: church nerd info coming* The church celebrates what are called liturgical seasons, which are associated with different colors and thematic ideas. </church nerd info> So, for example, if E already had 2 purple Advent stoles, I didn't want to make her another one! So finally one time when we were hanging out, I asked her if she would like me to make her another stole, and if she had ideas of the sort of thing she might want. E got really excited and said she already had a bunch of fabric that she'd bought with the plans of making herself some stoles, but had never gotten around to it, and she would love it if I would use that fabric to finally make those ideas into reality. She told me the fabric was for a baptism stole, with blue patterned fabric that looked like water. 

We got together a few weeks later for E to give me the fabric and pattern she had made. As soon as I saw the fabric, I got worried. The other stole I had made was out of denim, which is pretty thick and has nice structure, which you want in a stole. This fabric was super thin and light and flimsy. 


There would need to be some sort of middle fabric to give the stole some structure. Plus, the water-pattern fabric was semi-transparent, so I'd have to back it with plain blue fabric before attaching it to the same plain blue fabric for the back of the stole. That was a lot more layers than I'd ever dealt with before, and I wasn't really sure how to tackle it. And unlike other DIY projects, this isn't a popular thing people blog about online, so Googling was not helpful.

Luckily, I have another source - my mom's friend who makes stoles for my mom and had given me tips on E's last stole. I emailed her some pictures and described the fabric and my concerns. She gave me some ideas for different interface materials and how to layer everything so it would turn right-side-out correctly. She also suggested that I first sew the 2 fabrics for the front piece (the water-pattern and plain blue) together using a basting stitch to help make thing easier when I was putting together the rest of the layers. I cut out the water-pattern fabric and both the front and back pieces of the plain blue fabric.

Next I had to figure out what to use as the interface fabric. I had initially thought of batting, just because that's the only thing I really knew about. However, when I go to JoAnn and was looking around, I quickly realized that any batting was going to be too thick and pillowy to really look right. Near the fabric cutting counter I found several other types of interfacing, but they all seemed to stiff to go with the flowy, light fabric I was using. My mom's friend had mentioned that when she had made silk ties, she had sometimes used a flannel as the interface, so I went through my fabric drawers at home and found some scraps of materials to try out. I tried a few different things, including a flannel and the green denim I had used for the first stole I'd made. I cut out some small pieces from the leftover plain blue fabric and sewed the various potential interface materials between them. Then I felt their thickness and structure and solicited opinions from my husband and some other ministers I know. In the end, I decided to go with the denim. As a bonus, I still had plenty of it left over that I could use, so I didn't even have to buy any more materials!

After I I had all my pieces cut out and prepared, it was time to test out the theory that my mom's friend had proposed of how to lay them all out to get the stole to turn right-side-out properly. Obviously, I didn't want to sew the whole thing together only to have it come out wrong and have to take it all apart and start over. So I did a test-run with some scraps. I cut out plain blue scrap pieces and labeled them front right, front left, back right, and back left, so I would be able to tell if they were right-side-out or not. Then I laid them all out as my mom's friend had recommended, starting with the interface layer of denim, then the front layer, right-side up, then the back layer, right-side down. I pinned it, sewed it together, and turned it inside-out, and... success - all the layers were just as I wanted them to be! So now I just had to do it on a much larger, more important scale!


After reading about basting stitches, my understanding of the theory is that you take them out after completing your actual stitches. However, I was lazy and mostly didn't bother to do that. I only did it in a few areas where the basting stitch overlapped with the main seam stitch and so would have shown through on the other side. Then it was time for the moment of truth - turning it all inside out! Just as with my test pieces, it worked correctly! The fabric didn't lay nicely AT ALL, but after a good ironing, I got it looking like a proper stole. When I gave it to E a few days later, she was super excited. Now she just needs to find someone to baptize!