"I love my cats because I love my home, and little by little they become its visible soul." Jean Couteau

Saturday, October 22, 2016

coralling cookbooks

This is a project that has been vaguely in the works since July and stewing in my head since the beginning of June.

My grandma died at the end of May. Zach and I flew out for the funeral and I was able to pick out a few things of hers to keep (after my mom put in a heroic effort cleaning out her apartment!). One of these things was a box for holding cookbooks. I thought it was nice-looking and would help neat-ify the counter area where we keep cookbooks and loose recipes.


Of course, the box was too big to go in our carry-on suitcases, so my parents took it (and most of the other things we were getting) home with them. They brought some of it with them when they drove out to visit in July.


I liked the bird pictures on the front, but not the distressed look everywhere else. I'm more a fan of clean lines than distressing. My initial plan was to preserve the bird with a little off-white frame around it and paint the rest of the box the same red as our dining room. The color would go with some of the red in the bird picture, plus I still have a good amount leftover, so I wouldn't have to buy any new paint.


Unfortunately, as I put the painter's tape over the bird picture, then pulled it up to try to straighten it, I discovered that the picture wasn't painted on. It was some sort of pressed-on image, and when I pulled the tape off, it pulled a thin layer of the image with it. This meant I wouldn't be able to preserve the bird, and I needed a new plan. My plan was only partially-formed when I started work. I decided to still paint the box red, but I wanted some sort of design in white on the front to give it a little more interest and character. Only I didn't know what sort of design to do. Most of the ideas I came up with involved circular patterns, which I thought would be too hard to implement well with rectangles of painter's tape. So I figured I'd just get started and come up with an idea later.

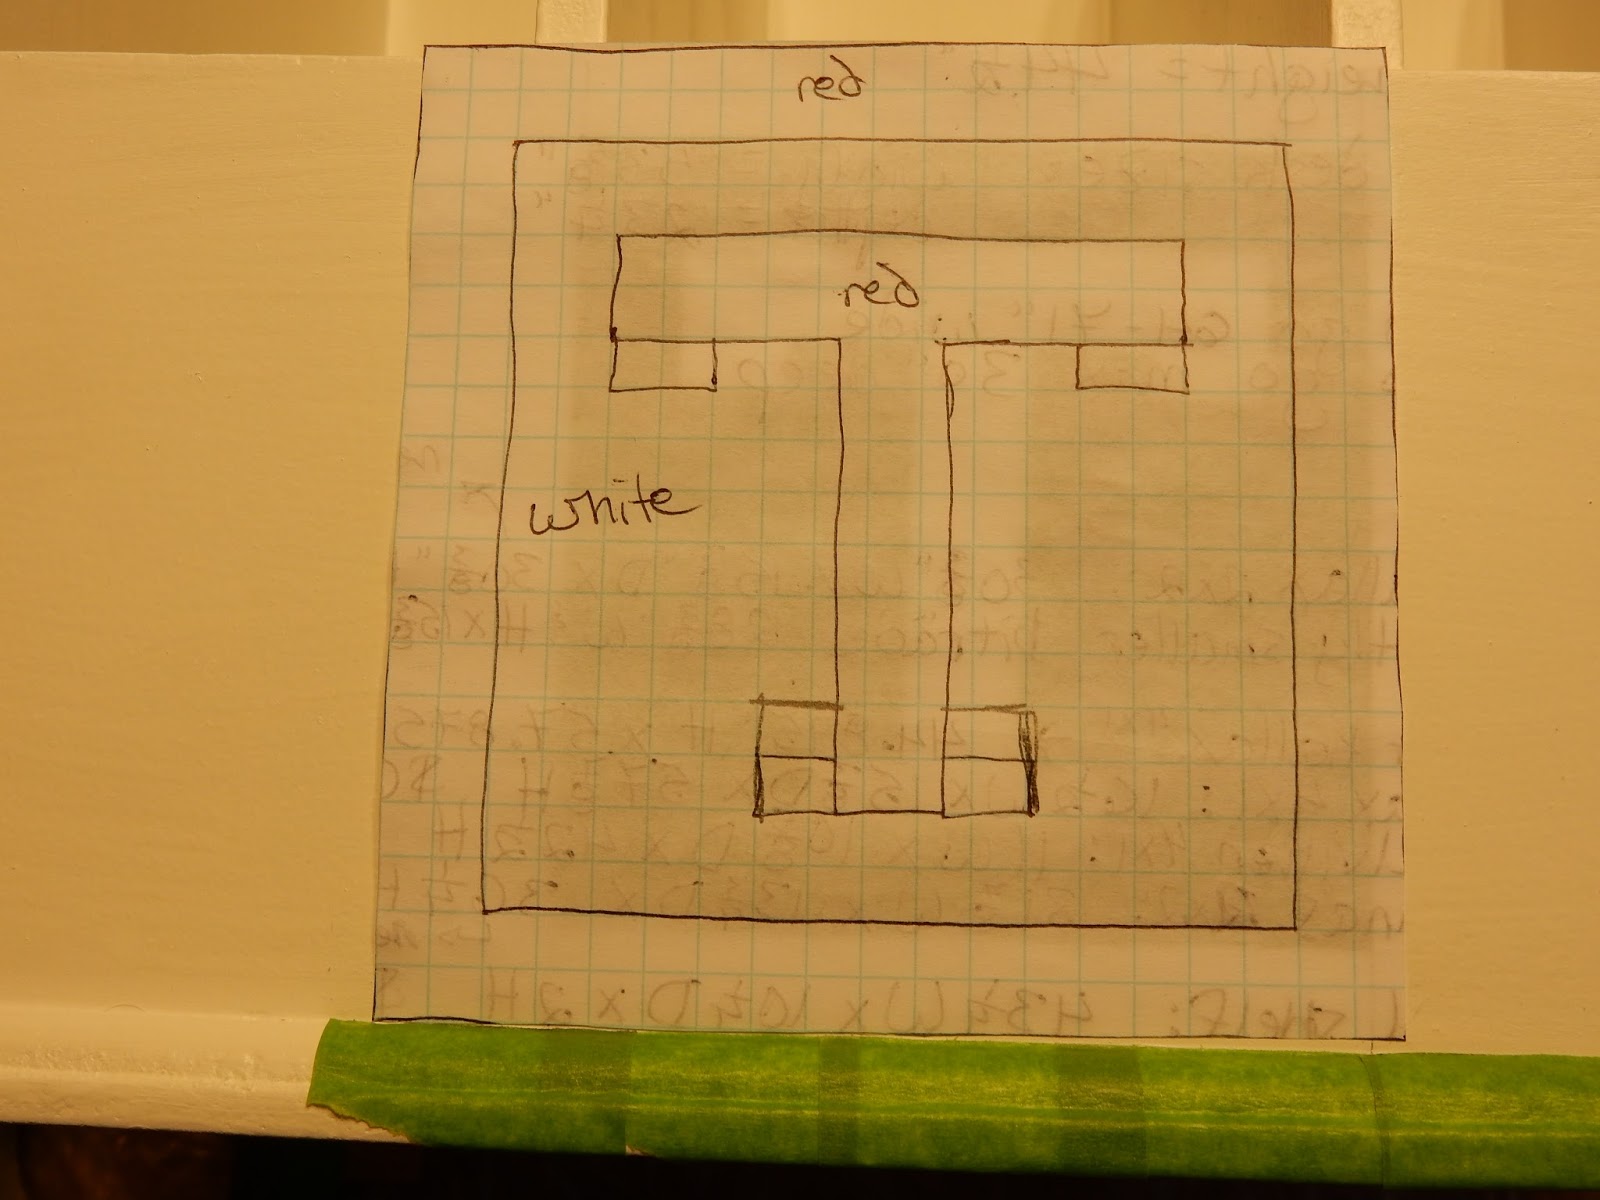
The first step was to paint the front white. As I was getting started, I decided it would look nice to also paint the inside and bottom trim white for some contrast. The white took two coats to cover the bird and look good. While that was all in process, I came up with an idea for the front design.


I came up with the idea to do a red block T (for our last name) with a white frame inside the larger red of the whole front. I measured the front to figure out the appropriate sizing and drew out my template on graph paper. I put painter's tape on the front covering the approximate dimensions of the white frame. Then I used the measurements from the graph paper drawing to measure out the design on the painter's tape. I used an Xacto knife to cut out the T that would become red. I also covered the trim with tape to keep it white.


Now I was ready to paint again. I mostly used a small foam roller to get a nicer finish without brush lines. I needed three coats to get good coverage of the red. I was pretty psyched because I'd expected to need four, which was what it took to look good on the dining room walls! After the last coat was mostly dry, I used the Xacto knife again to score along the edges where the tape was to help it come off more cleanly. There were some spots where the red had bled through (this always happens to me, which is why I generally don't bother with taping when I'm doing walls; is there some skill to taping that I'm missing? or a better brand? I've tried both the blue and frog brands), but since the paint was still a little tacky, I was able to scrape most of it off with the knife. I was pretty pleased with the result.


Since there were so many coats of paint on there, I let it dry a good long while before putting any cookbooks inside. When I did get around to finally putting it in its new spot, I discovered that not all our cookbooks fit in it. I guess that means it's time to purge out cookbooks that we don't use!

Saturday, September 10, 2016

taking a stand

After getting rid of my old desktop computer, my desk started to feel a little less useful and a little more sad. The drawers and shelves were still super useful, but as far as a usable desk-space, not so much. The desk top is too high for me to comfortably use my laptop there, and while I could set my laptop on the keyboard tray, that felt sort of awkward too. Most of the time, I use my laptop while lounging on the couch, but for extended use, I'm trying to get out of that habit, as I figure my sitting posture there is so bad. There are rare occasions when I work from home, primarily in the winter when our road doesn't get plowed, so I wanted a desk that felt more usable for working on either my home or work laptop. A number of people at my office have been getting standing desks. I haven't jumped on that bandwagon yet at work, but I thought maybe I'd give it a try at home. When thinking about what I wanted in a new home desk, that just felt right.


The problem with this idea, is that standing desks are generally super expensive and don't have any shelves or drawers. My current desk, as you can see from the picture below, has a good amount of storage, which I need because I have too much stuff. I wanted a desk that would still have plenty of storage and wouldn't break the bank. Now, one of the reasons that most standing desks are really expensive is because they're adjustable; they go up and down so you can get it to the correct height or even sit when you want to. I figured for a home workspace that I probably wouldn't use a ton, I didn't need to be able to put it down for sitting; if I get tired of standing, there are plenty of other places in the house I can sit for a bit. So as long as I had a desk that was the appropriate height for me to use a laptop while standing, I didn't need an adjustable desk.
I thought about building my own desk from scratch and started scouring the Internet for plans and ideas. That's when I started finding DIY not-from-scratch standing desks that use various bought pieces to create a desk. Many of the desks I found are made from Ikea shelves. Using shelves to build a desk also solves the storage problem! I found one Ikea hack standing desk that I really liked. Unfortunately, when I went on Ikea's website, they no longer make those exact pieces. Now, to be fair, the page where I found the hack didn't list desk dimensions. In any case, putting together the new, replacement Ikea pieces would have resulted in a desk about 2-3 inches too tall for me. I searched their whole site of shelves to see if I could come up with a different combination that would work. I got close, but the top pieces would have hung over the front and back of the bottom pieces, and I didn't think that would look that great.

Then I remembered a DIY table that I had just seen recently on one of the blogs I read regularly, Thrifty Decor Chick. Her table was shorter, but the idea was just two cube shelves with a tabletop across them. If I could find cube shelves that were the right height, that would work just fine. And I did find them! And also a tabletop that didn't add too much more height, so the final result would still be in the acceptable range!

The cube shelves are by Closetmaid and are 44" tall by 30" wide. I found them in a few places, but ended up buying them on Amazon to get free shipping for some other things I was getting there. Plus I have a credit card with them that gives me points for things I buy on Amazon. The tabletop is from the Container Store. Shipping would have added $20, so we drove to the nearest store about 30 minutes away.

When the cube shelves arrived, I had to assemble them, which went a lot more quickly than I had anticipated. Then Zach helped me set the desktop on top of them and get everything lined up. It turned out that I didn't have wood screws of the right length (some were too short, some were too long), so I had to wait a few days until I had time to get over to Home Depot


In that time, I had the opportunity to think about things some more, and I decided that the shelf backs were more visible than I had expected, and they didn't look good. You know what self-assemble shelf backs look like - unfinished cardboard. So I decided to paint them. At first I thought I would paint them white, since I have a bunch of white paint sitting around. But then I thought that would look weird. Then I thought of black, as I already have that too, but I decided it would be close enough but not quite a match to the shelf color that it wouldn't look very good either. So then I dug up my old Sherwin Williams color fan deck that I've had forever since my sister worked there in college. Zach and I went through it and found a color, Domino, that looked like it would be a really close match to the shelf color. I went over to our local store the next day and got a quart mixed up. 

I decided not to do any primer since that would actually lighten the color I'd be painting onto, which I didn't want to do for such a dark color. I thought I would need two coats, but after the first, I decided that was good enough. Plus, I started getting worried about bubbling and warping the cardboard with too much moisture. 


After the shelf backs were painted, we put the desktop back on. I clamped the top to the shelves, pre-drilled holes, and used 1.5" #8 wood screws to attach the desktop to the cube shelves. That was it! Super simple. Now it's just a matter of getting all my stuff put back on the shelves and getting re-organized, which I'm still working on weeks later :-p I haven't used it a lot, as expected, but I have used it some, and so far, I like having a standing-height desk :-)


a tent for a toddler

Our good friends who lend me their tools have a little girl. And that little girl is turning 2 years old! Last year for her birthday, I made her some rice-bag numbers. I wanted to make her something again this year, but I didn't think about it ahead very much, so I started scouring the Interwebs for something I could make in a pretty short amount of time. I also needed something that a 2-year-old would like. As I don't really have much experience with small children, I was having more trouble with that part than finding relatively simple DIY toys. 

Then I came across this little tent. I thought it might be perfect, so I emailed a couple of my other friends who know about small children to confirm that it would be a good choice. They basically said, "toddlers love tents!" And so it was decided.

The tent is basically an A-frame with a PVC pipe down the middle to enable it to hinge mostly flat for storage, then covered with a twin bedsheet. As I am all about trying to force my love of space onto impressionable young minds, I thought it would be really great if I could find sheets with stars on them, so when sitting in the tent, one could pretend to be looking up at the night sky. In my brief search, I didn't find exactly what I originally had in mind, but at Homegoods, I did find these:


Next it was on to Home Depot for the wood and pipe. The online directions called for 4 4'x1"x2"s and 2 60"x1"x2"s cut from 8' long 1"x2"s. 60" seemed kind of long to me; I figured for little children, 48" would be plenty long enough. Plus, then I could get away with buying only 3 1"x2"s instead of 4. A nice employee cut the 8' lengths in half, so my boards were all the right length and would fit in my car :-) When it came to picking out the PVC pipe, I again deviated from the online instructions. They called for 3/4" pipe, but when I held it up to my 1"2", it seemed too big, not leaving very much wood surrounding the pipe. So I went with a 1/2" pipe.

I got all my materials home and got to work. The pipe size is the inside diameter, so I measured the outside diameter to figure out how big my hole needed to be. It came to about 13/16", which of course, I don't have a drill bit for. I'm not sure if they even come in that size. I had 3/4" and 7/8" spade bits. I got some scrap wood to do some tests. It turned out, as expected, the 3/4" hole was too small and the 7/8" hole was too big. So I went back to the 3/4" hole and attempted to enlarge it. Using a coping saw to hack the hole bigger was fairly effective, but then there was still A LOT of sanding that needed to be done, which took for. ever. Eventually I gave in and made a trip back to Home Depot to purchase a set of files. This worked quite well, but still took a long time. Also, my holes were not quite round and not quite centered, but I figured for a kid, it was probably good enough. After getting all the holes done, I screwed the bottom cross-piece to the two side pieces for each side of the tent. I used my corner clamps to hold everything in place while I pre-drilled a little hole, then drove in the wood screw. I used #8 1.5" screws because that's what I had lying around.


The tent I'd found online just left the wood raw, but I decided it would be nicer to paint it. I had some spray paint leftover from other things. Since I was in a bit of a time-crunch, I used that instead of regular paint. I primed the tent pieces, then painted them white. I'd originally planned to paint them with some yellow I had leftover from painting a planter, but after seeing how much paint the priming used up, I didn't think I'd have enough. I thought, white is nice too.


After everything was painted, it seemed that enough paint had gotten inside the holes to make them too tight for the pipe, so it was back to filing them down again. Finally I was able to assemble the whole frame. 


Next I had to prepare the sheet. Since I'd gone with only 48" length for the tent, my sheet was much too wide. I did a bunch of measuring and math to determine how much to fold over on each side to make it fit. I did that, carefully measuring and pinning the sheet every 6" or so to hold it in place while I attached it to the tent frame.

The next step really required two people, so I enlisted my ever-obliging husband to assist. We had to get the sheet centered over the pipe and wrapped around the bottom board, held as tautly as possible. Then, while still attempting to hold it tightly, we had to put in a few staples to hold it all in place. Next we flipped the whole thing upside down, so we could wrap the sheet over the very bottom and staple it there. Of course, about halfway through, we ran out of staples, so it was back to Home Depot for more. The stapling was pretty hard, and a lot of the staples didn't quite go in all the way, but they went in enough that they could be hammered a bit to make them nice and flush. And then I had a tent!


We saw our friends the day after their daughter's birthday. At first she was a little unsure, but once we showed her how she could go in the tent, she had a pretty good time running back and forth through it. Hopefully, she will continue to enjoy her tent for quite some time.

Saturday, July 23, 2016

the end of an era

Today I said goodbye to an old friend. Her name is Roberta, and she has been with me since the summer of 2000. Roberta was my first computer, the one I got when I started college. Don't judge; we went through a lot together.


Yes, that's a beige computer with a CRT monitor. That's what computers were like in 2000. Roberta was a Dell desktop and came with a 20GB hard drive loaded with Windows 98. She had a CD-ROM (not writable) drive, a Zip drive, and a floppy drive! When I got to school, and the IT folks were helping get everyone's computers set up on the network, they had to assign the computers a name. They asked what I wanted to name my computer, and I chose Roberta after one of the characters in "Firestar" by Michael Flynn, one of my favorite novels at the time. Roberta was this tough, angsty, Goth, poet teenager, who my alter-ego totally identified with. And so I named my computer after her.


Roberta went through my changes over the years I was in college. I upgraded from Windows 98 to Windows 2000 and eventually to Windows XP. And this was back in the days when upgrading your operating system wasn't just a quick download. It meant backing up all your files because the install from CDs would wipe your hard drive, installing the OS, which took a long time, then reinstalling all your files. 

A friend gave me a small, 4GB hard drive, helped me install Redhat Linux on it, and taught me how to set up my machine to dual-boot. That saved my butt when I installed software that came with one of my textbooks that turned out to be incompatible with Windows 2000 and crashed my system. With dual-booting, I was still able to boot into my Linux drive and access my files to back them up before reinstalling Windows. Later, I replaced the original 20GB hard drive with a bigger, 80GB drive.

One of my sister's grad school friends gave me an old DVD drive he didn't need anymore, so then I could watch movies on my computer, which was exciting. At another point, I replaced the old CD-ROM drive with a CD read-writable drive, so I could burn lots of music CDs to play in my car. 

The first time I opened up my computer, I forget what it was for, probably to add a hard drive, I was so scared. Excited, and scared. As an electrical engineering major, I was super excited to learn about the insides of my computer, especially since I was at school with tons of guys who had already built their own computers from scratch. And I was terrified of breaking it. But I had friends who helped me and taught me, and I didn't break anything, and I learned how to figure things out. I learned practical things that weren't taught in any of my classes.

Now, at home, I prefer laptops, small, portable, grab it and sit on the couch and write emails or scan Facebook or whatever. But you can't take them apart and upgrade them the same way you can a desktop because everything has to be packed in there just so. 

I've kept Roberta for 16 years. For the past several, she's just sat on my desk, collecting dust and various unimplemented plans. I've decided that I might like to actually use my desk sometimes, on the rare occasions when I work from home, and so it was time for Roberta to go, to make room for new things. Because sometimes, you can hold onto the memories, while letting go of the things, and that can be OK.

Sunday, July 17, 2016

hanging and rearranging

Zach and I went on vacation to London a few months ago. I didn't necessarily expect us to get much in the way of souvenirs, so a big part of my plan for the trip was to get some really great classic-shot photos, print them in black and white, and frame them up in our house. Well, mission accomplished. In my personal opinion, I was able to get some pretty great shots. 

I hadn't had photos printed anywhere in a really long time, so I asked some Facebook friends for recommendations. I didn't get many, but one of them was mPix.com, so I went there. I got eight 8x10 mostly black and white photos printed (I did some selective colorization of a few things, like the iconic red telephone booth). Then I went to Michael's where, luckily, they were having a buy one get one free sale and 8x10 wall frames :-D

Then it was a matter of figuring out where to hang all these photos. We don't actually have a lot of big walls available -- most are filled with windows, and the others are covered with big furniture or other art. So I'd been thinking I'd have to split up the photos, but as I was pondering where and how to do that, I had the brilliant idea that I could just MOVE one of our other art pieces off the long wall in our main hall. DUH! 


We'd just move that red painting on the right across the hall to the weird-shaped empty wall above the recycle bin.


I asked Zach what he thought, and he agreed it was a good plan. So then I got to work laying out the photos, figuring out which should go where. Michael's hadn't had 8 frames all the same, so I'd gotten 4 and 4, so I wanted to kind of mix around the frames, so the same ones weren't all grouped together. I'd also done 4 photos with some selective colorization and 4 straight black and white, so I wanted to mix those around too. 


I got a layout I was OK with and then enlisted Zach's help for the hanging. We started at the far right. We measured the height of the entire group and just eye-balled where we wanted that on the wall. The first picture was going to be pretty much centered on that overall height, and we knew where its edge was supposed to be (about even with the light switch plate), so then I just held up the picture and stuck my finger down where the hanger was on the back. I handed Zach the picture while keeping my finger marking the spot, and he handed me a nail. And that's about how we went the whole way, measuring distance between pictures, eye-balling height, getting pretty close with holding the picture up and sticking a finger by the hanger. I didn't care if it was all super precise, as long as the spacing looked generally pleasing at the end. And I think it does :-)


We hung the other picture up on the opposite wall, and now we have more art-covered walls!


Monday, July 4, 2016

more fun with stoles

I know I haven't posted in a long time, but I haven't done any projects in a long time. I've felt plenty busy enough with just life to not bring extra stuff into it. But I finally got around to a project I promised my very good friend back at the beginning of April. Now, I didn't put a time frame on when I would get this done for her, so it's OK that it took 3 months!

My very wonderful friend, E, is a minister. Back when she got ordained, I made her this stole. I'd been thinking that I'd like to make her some more stoles, but I wasn't sure what she had or needed. *Warning: church nerd info coming* The church celebrates what are called liturgical seasons, which are associated with different colors and thematic ideas. </church nerd info> So, for example, if E already had 2 purple Advent stoles, I didn't want to make her another one! So finally one time when we were hanging out, I asked her if she would like me to make her another stole, and if she had ideas of the sort of thing she might want. E got really excited and said she already had a bunch of fabric that she'd bought with the plans of making herself some stoles, but had never gotten around to it, and she would love it if I would use that fabric to finally make those ideas into reality. She told me the fabric was for a baptism stole, with blue patterned fabric that looked like water. 

We got together a few weeks later for E to give me the fabric and pattern she had made. As soon as I saw the fabric, I got worried. The other stole I had made was out of denim, which is pretty thick and has nice structure, which you want in a stole. This fabric was super thin and light and flimsy. 


There would need to be some sort of middle fabric to give the stole some structure. Plus, the water-pattern fabric was semi-transparent, so I'd have to back it with plain blue fabric before attaching it to the same plain blue fabric for the back of the stole. That was a lot more layers than I'd ever dealt with before, and I wasn't really sure how to tackle it. And unlike other DIY projects, this isn't a popular thing people blog about online, so Googling was not helpful.

Luckily, I have another source - my mom's friend who makes stoles for my mom and had given me tips on E's last stole. I emailed her some pictures and described the fabric and my concerns. She gave me some ideas for different interface materials and how to layer everything so it would turn right-side-out correctly. She also suggested that I first sew the 2 fabrics for the front piece (the water-pattern and plain blue) together using a basting stitch to help make thing easier when I was putting together the rest of the layers. I cut out the water-pattern fabric and both the front and back pieces of the plain blue fabric.

Next I had to figure out what to use as the interface fabric. I had initially thought of batting, just because that's the only thing I really knew about. However, when I go to JoAnn and was looking around, I quickly realized that any batting was going to be too thick and pillowy to really look right. Near the fabric cutting counter I found several other types of interfacing, but they all seemed to stiff to go with the flowy, light fabric I was using. My mom's friend had mentioned that when she had made silk ties, she had sometimes used a flannel as the interface, so I went through my fabric drawers at home and found some scraps of materials to try out. I tried a few different things, including a flannel and the green denim I had used for the first stole I'd made. I cut out some small pieces from the leftover plain blue fabric and sewed the various potential interface materials between them. Then I felt their thickness and structure and solicited opinions from my husband and some other ministers I know. In the end, I decided to go with the denim. As a bonus, I still had plenty of it left over that I could use, so I didn't even have to buy any more materials!

After I I had all my pieces cut out and prepared, it was time to test out the theory that my mom's friend had proposed of how to lay them all out to get the stole to turn right-side-out properly. Obviously, I didn't want to sew the whole thing together only to have it come out wrong and have to take it all apart and start over. So I did a test-run with some scraps. I cut out plain blue scrap pieces and labeled them front right, front left, back right, and back left, so I would be able to tell if they were right-side-out or not. Then I laid them all out as my mom's friend had recommended, starting with the interface layer of denim, then the front layer, right-side up, then the back layer, right-side down. I pinned it, sewed it together, and turned it inside-out, and... success - all the layers were just as I wanted them to be! So now I just had to do it on a much larger, more important scale!


After reading about basting stitches, my understanding of the theory is that you take them out after completing your actual stitches. However, I was lazy and mostly didn't bother to do that. I only did it in a few areas where the basting stitch overlapped with the main seam stitch and so would have shown through on the other side. Then it was time for the moment of truth - turning it all inside out! Just as with my test pieces, it worked correctly! The fabric didn't lay nicely AT ALL, but after a good ironing, I got it looking like a proper stole. When I gave it to E a few days later, she was super excited. Now she just needs to find someone to baptize!


Monday, February 15, 2016

here comes the sun

This isn't a post about DIY. This is a post about the fact that we are now officially a partially solar-powered home!


This story goes back a few months, but really starts even before that because I've always been interested in solar, but figured it was generally too expensive and not worth it. Lately, places like Solar City have become pretty well known, but from the little I heard about them, leasing for 20 years just didn't sound like that great a plan to me. Then back maybe in September or so, I heard about a meeting about group pricing for solar panel installation nearby, so I went. It was all organized through a non-profit called Retrofit Baltimore, which had negotiated super low installation rates with several local solar companies. Apparently, part of the high costs is simply customer acquisition, which Retrofit Baltimore was taking on, enabling the solar companies to offer lower rates. Plus, Retrofit Baltimore had already done all the vetting of the companies to pick good, reliable ones. 

Given the rates, plus the various government tax rebates (which may be expiring after this year), Zach and I decided it was worth investigating further. We'd get assigned one of Retrofit Baltimore's solar companies (we got Direct Energy Solar), which would get some satellite images of our house and meet with us to give some estimates of how big an installation we would be able to get, how much power that would generate, and how that would compare to how much power we use. All of these consultations would be at no cost to us, so we figured why NOT find out what we could do and what it would cost. 

It turns out, it would cost a lot. But, they estimated that we should be able to generate about 90-95% of our electricity usage, which we were both totally surprised by, given the fact that we're in a townhouse with a fairly small roof. Based on all the numbers, we figured we should make back our money in about 8 years, so we decided it was worth the investment.

Now, all of this depends on where you live. We're helped A LOT by the fact that we live in MD, which has net metering. Net metering means that, during the day when we're not home and not using much electricity but producing a lot, that all goes into the grid and powers other people's homes and businesses. Then when we come home at night and start needing more electricity, we pull back from the grid. Some days we may take more than we generated, other days we may take less. The electricity company keeps track, and it sort of balances out, and at the end of the month we just pay for that small balance. To me, this seems like an obvious way to do things, but apparently not all states have net metering. And, if we overall use less than we generate, the electricity company doesn't pay us at the same rate that we pay them, so we don't really make much money.

Anyway, the next thing to do was sort things out with our HOAs. Yes, I said HOAs, plural. We have two. Though one doesn't really care what we do and, in fact, doesn't have a form for making changes to your home and the president didn't reply to Zach's email inquiry asking if we needed to do anything, so we really only had to deal with the one. It turns out, HOAs cannot keep you from installing solar panels. They can, however, impose certain restrictions. Like, the conduit running from the panels on the roof to the breaker box in the garage must be run discretely along the side of the house with the downspout. We were pretty much planning on that anyway, but it did mean that, instead of just looping the conduit over the edge of the roof to come down, they popped it into the roof and back out the side of the house to make it "more discrete." So we had to fill out some forms and wait a few weeks for approval. Finally, the week before Christmas, our installation got scheduled!

The team came the first day, set up their ladder to get started, and it wasn't tall enough. Although there had been guys up on our roof before to do a survey, there seemed to have been some miscommunication about how tall of a ladder was needed, and the type of ladder that was, presumably, used for the survey was a skinnier, weaker ladder that wouldn't work for hauling solar panels up. So now they needed to get a lift. Which wouldn't be available until the next day. Off to a rousing start! However, the team stayed and were able to still get a decent amount of work done. The electrician got all the work done in the garage, and the rest of the team assembled a bunch of panels and left them in the garage to be ready for installation the next day.


The lift arrived the next morning, and the team got to work. They worked hard all day and got a lot of work done. With 34 panels to install, even with the prep they'd done the day before, they couldn't get it all done and had to come back for a third day. Unfortunately, that third day, it rained. There was a brief break, when they started work, but then the rain started up again. Those crazy guys just kept working, though, and finished installing the solar panels. That's dedication!


Our discretely-run conduit


We have lots of new electrics on the side of our house next to our electricity meter. One is another meter that keeps track of lifetime energy production of the solar panels. We also have a WiFi monitor in the garage that sends health status info to Direct Energy Solar about each panel, so if any one of them has a problem, they'll know about it and can come take care of it. We can also check on the status of our installation on a website to see how much energy it's producing and if any of the panels have a problem.

The next week, the county inspector came out to sign off on the job. Then we had to wait another few weeks for the electricity company to come switch out our meter to a new, special "net meter." Once they did that and we got their email of approval, we were able to flip the giant switch on the side of our house and start generating our own electricity!

I often check the website to see how our panels are doing. It's a little hard to tell, since it's only about production, with no comparison to how much energy you're also consuming. I've done a little averaging and extrapolating and compared that with our energy usage from last month, which doesn't look too good. Of course, it is winter, so even when it's not snowing, the weather is often grey. Presumably, we'll do better as we move more into spring and summer. Mostly, right now, I'm just anxiously awaiting our next electricity bill to see how we do. I never thought I'd actually be WANTING to get an electricity bill!

Thursday, January 28, 2016

christmas doors

OK, so I'm a little behind on my posts. Sorry about that. I have no good excuse, so I won't try to make one up. 

For Christmas, I promised Zach that I would make him doors to go on the display shelf I had made him for our anniversary. This project wasn't too hard; I pretty much whipped it off in a weekend. The main trick was just getting the pieces just the right size to fit in the grooves I'd already made in the shelf. I made each door 1/3rd the total width of the shelf, so one section would always be open and the other two sections would be closed.

I'd planned to use the same wood as for the rest of the shelf and had even done a dry test when I'd originally cut the grooves to make sure of the fit. But I guess with the addition of a couple of layers of paint it was just enough to make it too tight because when I cut my first piece and went downstairs to test it out, it was too wide to fit in the groove. So I figured down a bit narrower and went to Home Depot to see what I could find. What I found was pressed and sanded plywood for making cabinets that was just the right size. I was psyched to not have to get a giant sheet of plywood that wouldn't fit in my car. 

Each door took several iterations, from the initial cut, test the fit, then slowly sanding down more and more to get it just right (because I always erred on the side of a little too big to start), plus all the edges nice and smooth for good sliding action. Then it was time for priming with my usual Kilz latex, then painting with my usual Glidden black sample pot. I had also gotten handles to make it easy to grab and slide the doors back and forth.


Zach isn't one to get super excited about a lot of things, but he was impressed by the knobs, thinking they made the doors look fancy. And I think having the doors makes the shelf look a lot nicer overall, hiding most of the disembodied superhero heads from view!


Wednesday, January 27, 2016

some things are better to not diy, but some things you have to

We have a cat room. I believe I've mentioned it before. It's one of the spare bedrooms in our house where the cats have a big cat tree and some climbing shelves, their food and most of their litter boxes. Plus we shut them in there at night so they don't bother us. They really like their room and hang out in there a lot during the day, even when they have full range of the house. 

Even after our forays into the world of animal behaviorists (which you can read about here and here), we still seem to go through phases of bad behavior in the cat room, though I'm happy that it's at least confined there. The problems are definitely worse at night, so it may have to do them being shut in there and just something we have to live with in order to get better sleep.

The real problem with all this is the floor. As mentioned above, the cat room is a spare bedroom. It is carpeted. When we first moved in and made it the cat room, we covered a significant portion of it with a plastic dropcloth and rubber puzzle mat, like they have in nursery schools for kids to play on. This has been a HUGE help in cleaning up messes, even just the litter and food crumbs that inevitably spill all over the place. However, it's not perfect. It buckles, and there are little cracks between the puzzle pieces, and every now and then we have to pull up most of the pieces and clean them, which is a hassle. Plus, the mat doesn't cover the entire floor, and recently the problem area has been in one of the few areas not covered by the puzzle mat, i.e. on carpet. This caused me to finally say enough is enough, we need to replace this carpet with something more cat-friendly.

My initial thought was ceramic or porcelain tile. I know that to be quite impervious to liquids. My dad had recently redone both the bathrooms in their house, so I called him up to see if he might be available sometime to come help. He said sure, but also brought up vinyl as a really good option. When I thought of vinyl, I thought of cheap old linoleum, thin and pealing and gross, but my dad said a lot of vinyl is thick and good and long-lasting. So I did some research and decided that vinyl sounded like it would be just as impervious for our needs as ceramic or porcelain and would be a lot less work and expense. 

Then came the decision of what kind of vinyl. Back when my parents put the vinyl in their laundry room that is still there today, there was only sheet vinyl. Today, there are also plank and tile vinyl and loose-lay vinyl. We visited a local flooring store, Bode Floors, to talk to some folks about what would be the best choice for our needs. Although the woman we spoke to and pretty much everything I read online claimed that any of the plank, tile or loose-lay options would be completely water-proof for our needs, I remained skeptical. Plus, like hardwoods, most of these options required an expansion gap around the perimeter of the room. Even though moulding would cover it up, I still worried about liquid sneaking in there. After debating back and forth for a couple of weeks, we finally decided to go with the old sheet vinyl stand-by. 

I was told by both my dad and another DIY-er I trust that, if we chose sheet vinyl, we should not lay it ourselves. It's just big and heavy and awkward, and you have to lay it just right in a tight area. So, we listened. We went back to Bode Floors and ordered some floor to be installed. 

There was one part we DIY-ed though -- the carpet removal. We wanted to take it up to have time to clean any potential stains that may have made it to the subfloor. As we were going through the contract, it turned out we would have had to do it even if we hadn't wanted to -- their contract states that, for health reasons, they won't remove urine-soaked carpet. 

We scheduled the floor install for a Monday, so we'd have the weekend to clean out the room without having too long of a disruption to the cats. The initial part went pretty quickly -- take out the bookshelves, cat tree, litter boxes, assorted other miscellaneous bins and cat things that live in there. The toughest part was figuring out where to put the cats' food and litter boxes for the few days they'd be evicted from their room. Our house doesn't give us a lot of options. We settled on the dining room. Yay, litter boxes in the dining room. 


Next came pulling up the carpet. The guy from Bode Floors had told me exactly where to cut the carpet at the door threshold, which was very helpful because I would have cut it in the wrong place. You want the vinyl to only come to the inside of the door, so it kind of depends which side of the jamb your door sits on. If you close the door, it helps you visualize it. Indeed, the area of carpet and carpet padding near the door was super gross. We'd had it covered up with carpet runners for the past few weeks, which held the smell in, but pulling the carpet up let everything out. If only you could take pictures of smell. Actually, it's good we can't do that yet because it would be really nasty. 

Underneath that gross carpet were brown stains on the subfloor. I sprayed them liberally with Nature's Miracle. This has been our go-to cleaner. It's an enzymatic cleaner, so it breaks down all the urine into particles that don't smell anymore. I'm not saying this is better than any other enzymatic cleaner out there. It's just what we use. After letting it soak in for awhile and then letting it dry, I'd paint over it with Kilz primer to seal in any remaining odor, just like when I did the stairs


Zach pulled up all the tack-strips while I corralled all the carpet pad and disgusting carpet into trash bags. Since the cats really like to sit and roll around on carpet, we decided to keep some of the good condition carpet pieces for their room. The plan is to keep a few pieces, but just put out one at a time, so if they ruin it, there's more. Zach also did most of the staple-pulling. This is pretty much the worst part of removing carpeting, pulling out all the staples left behind from the carpet pad. He did great. Then it was vacuuming everywhere with the shop-vac to get all the little left-behind bits to leave a nice, relatively clean subfloor.

It turned out that some of the baseboard was also in pretty bad shape, so replacing that quickly got added to the to-do list and that "no, we shouldn't need any help" that we told our awesomest friends ever turned into a "yeah, actually, i could really use your help and your miter saw" phone call.


I had a big piece of baseboard that had somehow I guess been a free gift with purchase of the stair nose. Super weird, but it was in the box when that arrived, and I didn't seem to be charged for it, so I just stuck it in the garage. It looked super long, so we didn't actually measure it (bad idea), and just started cutting. Then it turned out to not be quite long enough. However, if we hadn't cut it, it would have been long enough for the main wall, and the old piece had a big enough good section to cut for the small wall. Of course, now we'd cut it up, so that wasn't going to work so well, so now it was off to Home Depot. Lesson: MEASURE FIRST. 

Actually, first it was off to homedepot.com to see if they even had anything in stock that would match. A lot of times, things are only available online. Luckily, we found something in stock that looked like it would be a close match. From the online description, it sounded exactly like our moulding, though when we found it in the store, it wasn't a perfect match. However, for the cat room, with a strict time deadline, I said close enough. 

We had now measured the exact amount we needed. We got the new baseboard cut and installed. Then we all ordered Chinese takeout to make all the work worth it.

Sunday, I finished up painting the floor (I did 2 coats). I also finished the baseboard, filling nail holes, caulking, painting. I also had to spackle patch up the wall a bit where the drywall had ripped up some when I was pulling the old baseboard out. 

Monday, the vinyl floor guys came. They put down additional plywood subfloor to get the new floor closer to carpet height. Then they laid the vinyl. It took several hours, a lot longer than I was expecting, but they did a great job, and we're very happy with the result. Plus, a few months in, and maybe only one peeing incident. We did also rearrange the cat room, the bookshelves and litter boxes to make it a bit more open where the litter boxes are. That may have helped as well. But we couldn't have done that with the old flooring arrangement. The cats also did so well for the few nights they were out of their room during the floor reno that we've also been letting them stay out of their room at night, so I'm sure that has helped as well.